Here you will read how to add layers to Google Maps in GPS app Apglos Survey Wizard. It is important to use layers during land surveying. In this way you know what you surveyed.
The startpoint to add layers to Google Maps in GPS app Apglos Survey Wizard
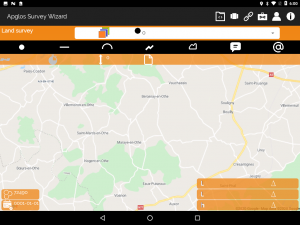
Of course you have to be logged in Apglos Survey Wizard. So then you see this screen.
If you don’t see this screen then you have to do some steps. In the top in the menu bar you see the icon that looks like this:
![]()
Click on this icon. Then you will see the following sub menu:
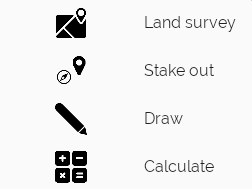
In the sub menu you click on the option “Land survey”. This will bring you to the mapping screen as mentioned above.
So let’s start now
The first thing you need to do is to go to the layer manager. To do that you click on the icon that looks like this:
![]()
After that a new screen will appear.
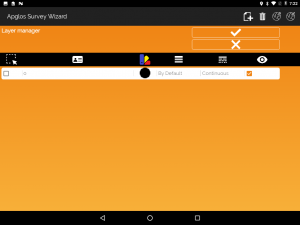
On this screen all the layers are mentioned that are in the land survey file. When we want to add layers to Google Maps in Apglos Survey Wizard then we need to click on the icon that looks like this:
![]()
The icon is on the top side in the menu bar of the screen. After clicking on it a new screen will appear.
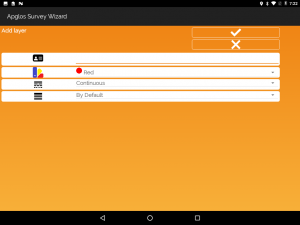
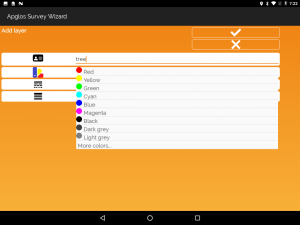
This is the “Add layer” screen.
Using the “Add layer” screen
First we need to fill in the name of the layer next to the name icon
![]() .
.
You can put here anything you want to map. The color you can select by clicking the color next to the color icon
![]()
When you do this you will see the following screen.
You can also select the line type of the layer. This is done by clicking the current line type next to the icon that looks like this:
![]()
If there are no other line types than “Continuous” then no DXF-files with other line types have been opened in Apglos Survey Wizard.
The last thing to change your layer is to change the line weight behind the icon of line weight:
![]()
When you click on the line weight next to this icon the dropdown list will appear:
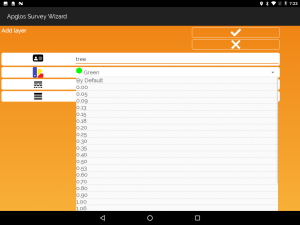
Here you can select any line weight that will be used to the DXF output of Apglos Survey Wizard.
After creating the complete layer
Now when you have finished configuring the layer you need to do some final easy steps to make Apglos Survey Wizard save it to the drawing.
First you click on the “OK” button.
![]()
Then you will go back to the screen of the layer manager.
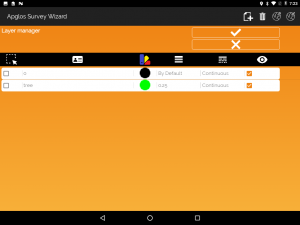
Here you will see the layer that you created is added. On this screen you also click on the “OK” button.
![]()
This will lead you back to the mapping screen. After that you will be able to select the layer you created. We will describe that in another tutorial.
So that is how you add layers to Google Maps in Apglos Survey Wizard.