This is the only up-to-date manual of land survey app Apglos Survey Wizard. When in an update changes something then we will also change it in this manual. So the location to find the most up-to-date manual of Apglos Survey Wizard is this page.
Logging in
Log in screen
When you first start Apglos Survey Wizard than you will see the log in screen.
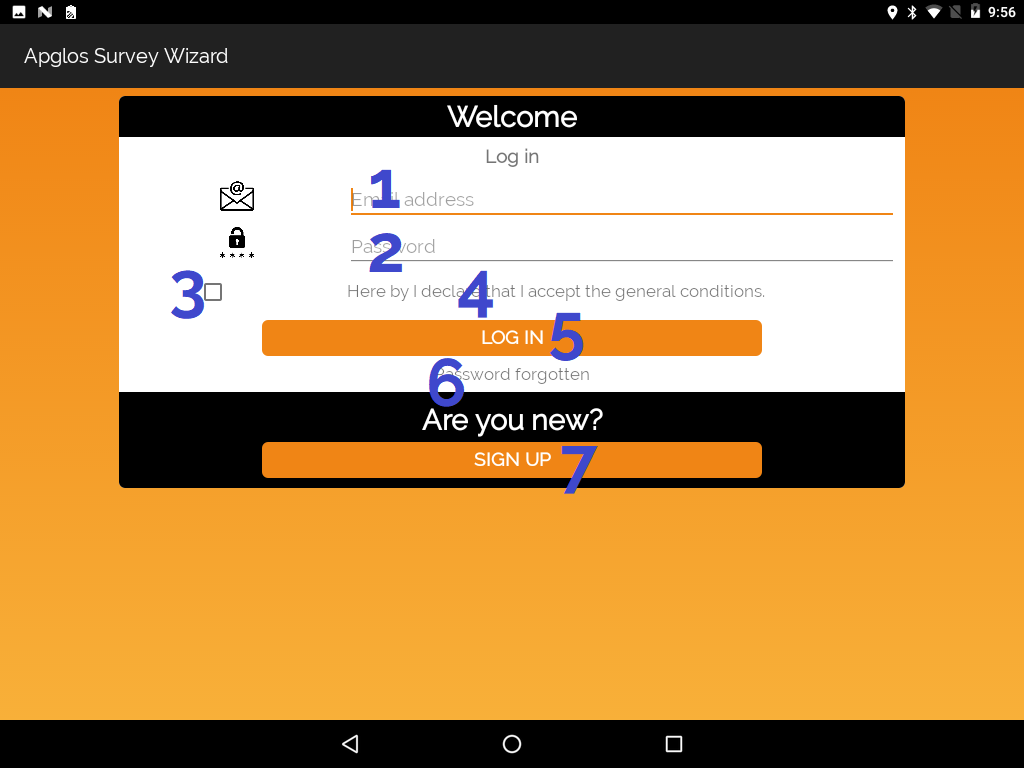
- Here you fill in the email address that you have registered with for Apglos Survey Wizard
- Here you fill in the password that you have for Apglos Survey Wizard
- Click here to accept the general conditions of Apglos Survey Wizard. Without having this box checked you can’t get in Apglos Survey Wizard
- When you click on this text a page will open in your webbrowser with the general conditions of Apglos Survey Wizard
- Click this button to log in Apglos Survey Wizard
- Click this text to go to the Retrieve password screen
- This button will lead you to the Sign up screen.
Sign up screen
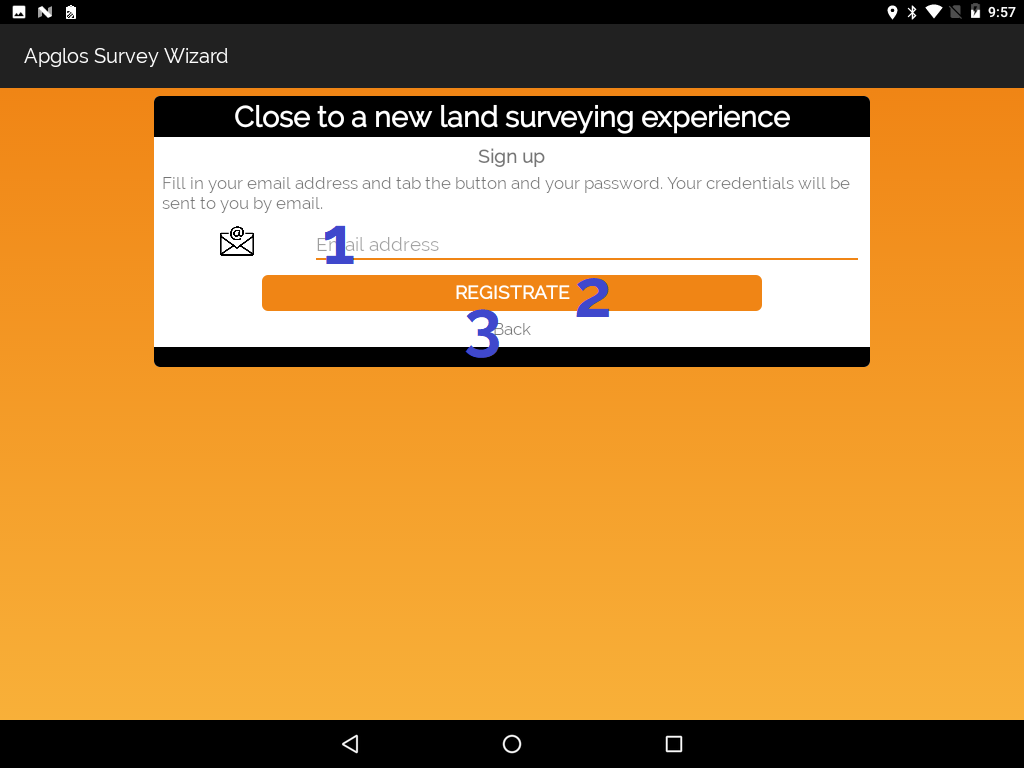
- Fill in here the email address that you want to use to register for Apglos Survey Wizard
- Button to register your email address for Apglos Survey Wizard. You will receive an email with your password.
- Click on this text to go back to the Log in screen.
Retrieve password screen
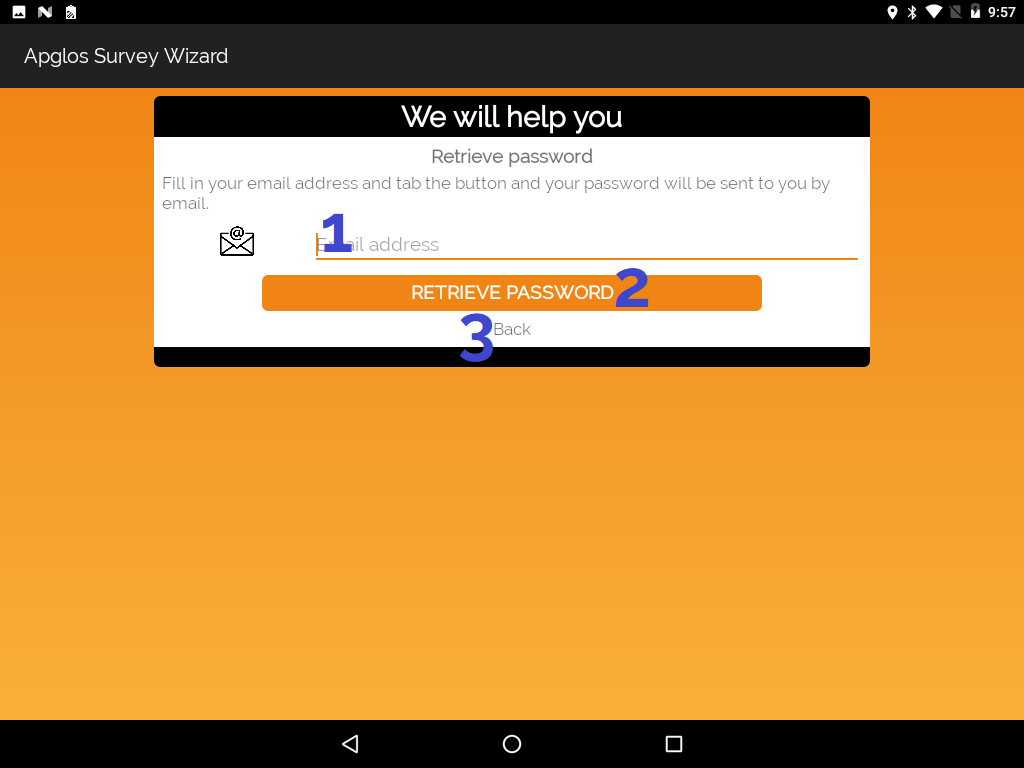
- Fill in here the email address that you are registered with for Apglos Survey Wizard
- When you click on this button an email with the password will be send to the email address you filled in number 1.
- A click on this text will take you back to the Log in screen.
Menu’s in Apglos Survey Wizard
Menu’s in main screen
On the main screen on the top right of the screen there is the menu.
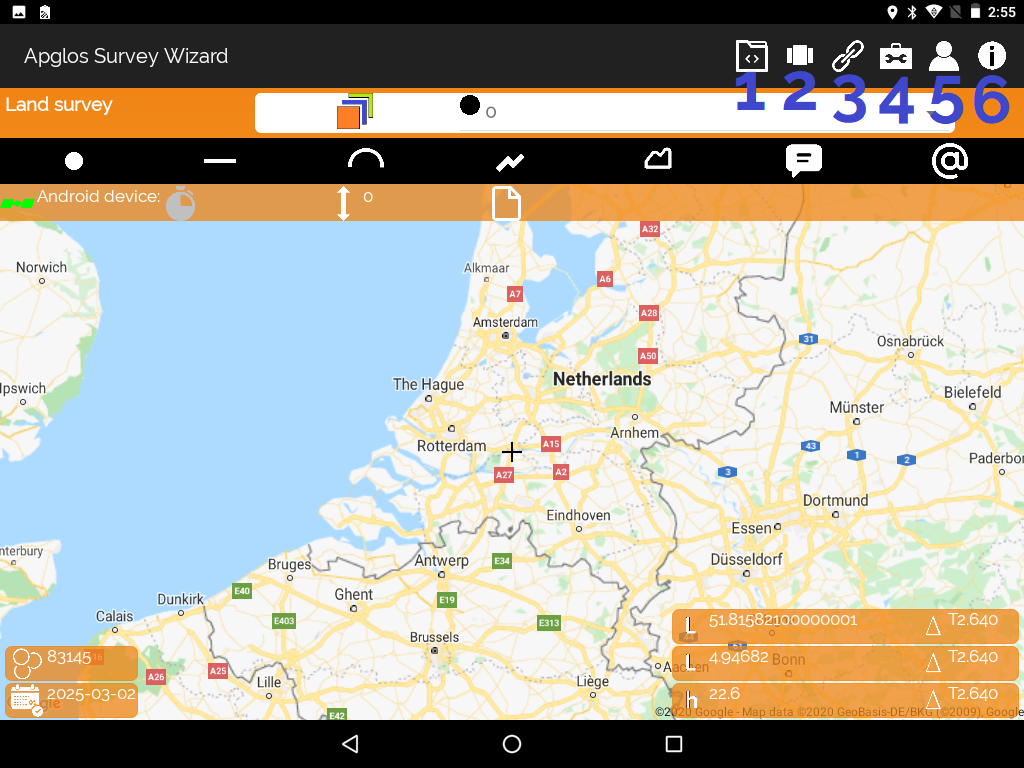
- File menu
- Screen menu
- Connection menu
- Toolbox menu
- Profile menu
- Info menu
File menu
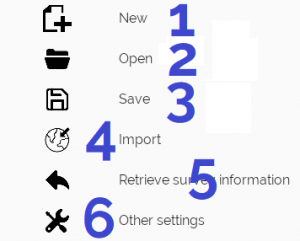
- Item for starting a new project.
- Click here to open a project. You will go to the Open screen
- Save the data of the project. You will go to the Save screen
- Import special files. You will go to the Import screen
- Click here to restore the last data of Apglos Survey Wizard that was there before the application closed
- Go to the Settings screen
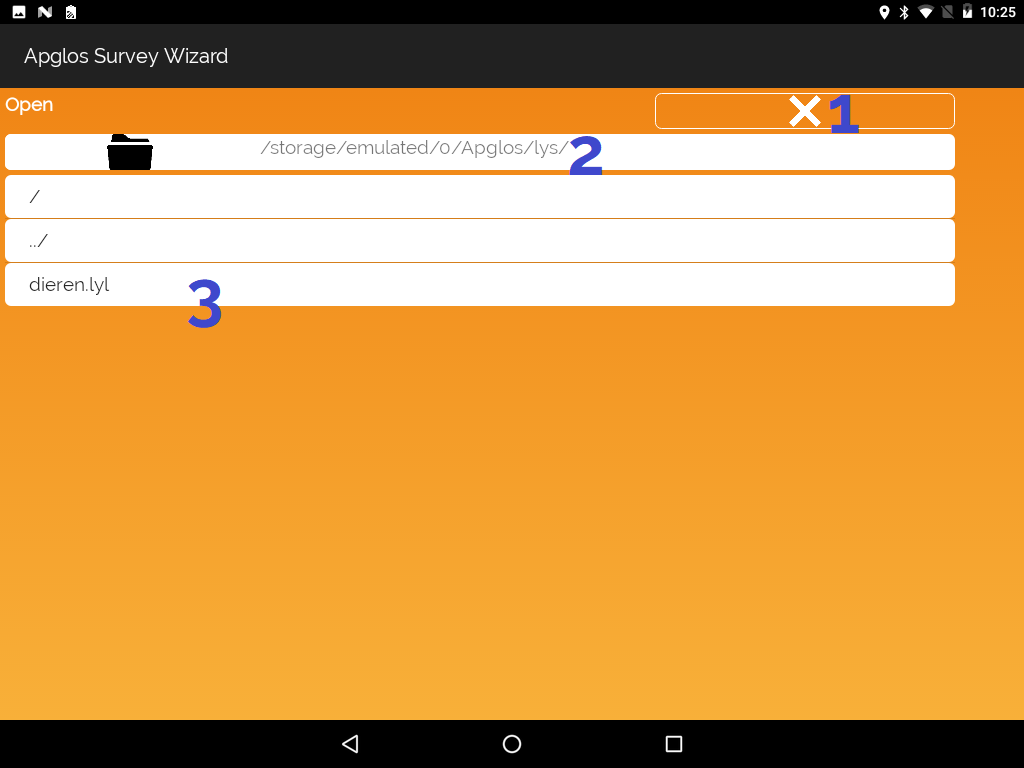
Open screen
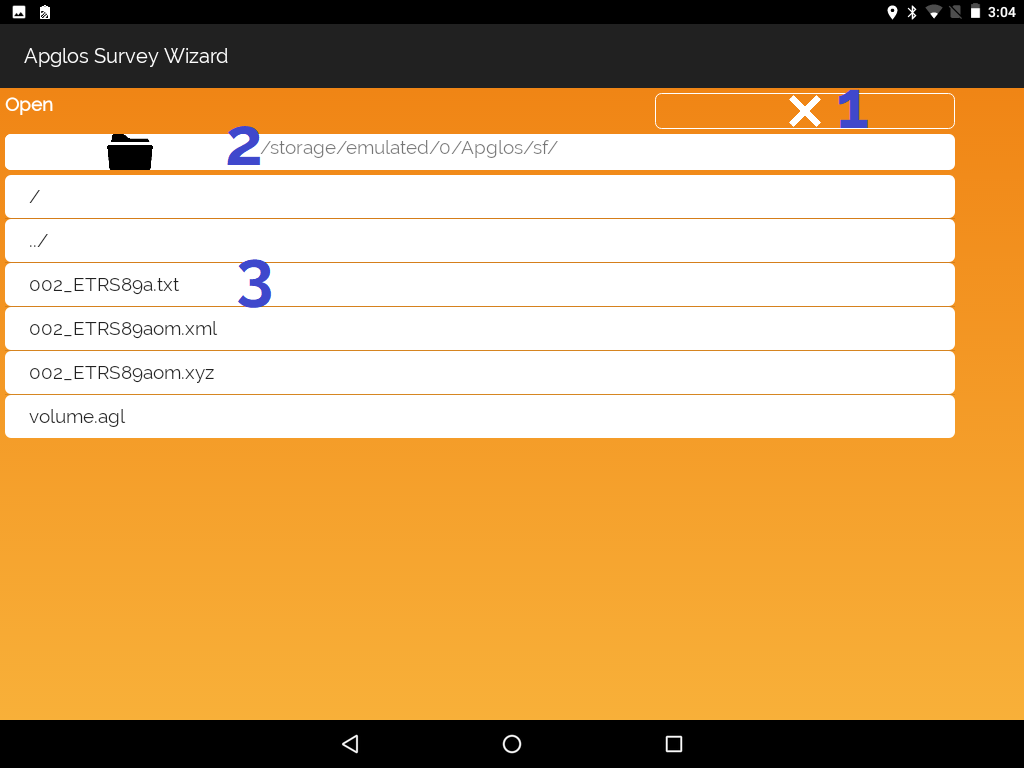
- Button to go back to main screen
- Name of current folder
- Files in current folder. Click on the desired file to open.
When you open certain file types then you might be lead to a certain screen for the file types.
Open AGL file screen
AGL is the standard file format for Apglos Survey Wizard.
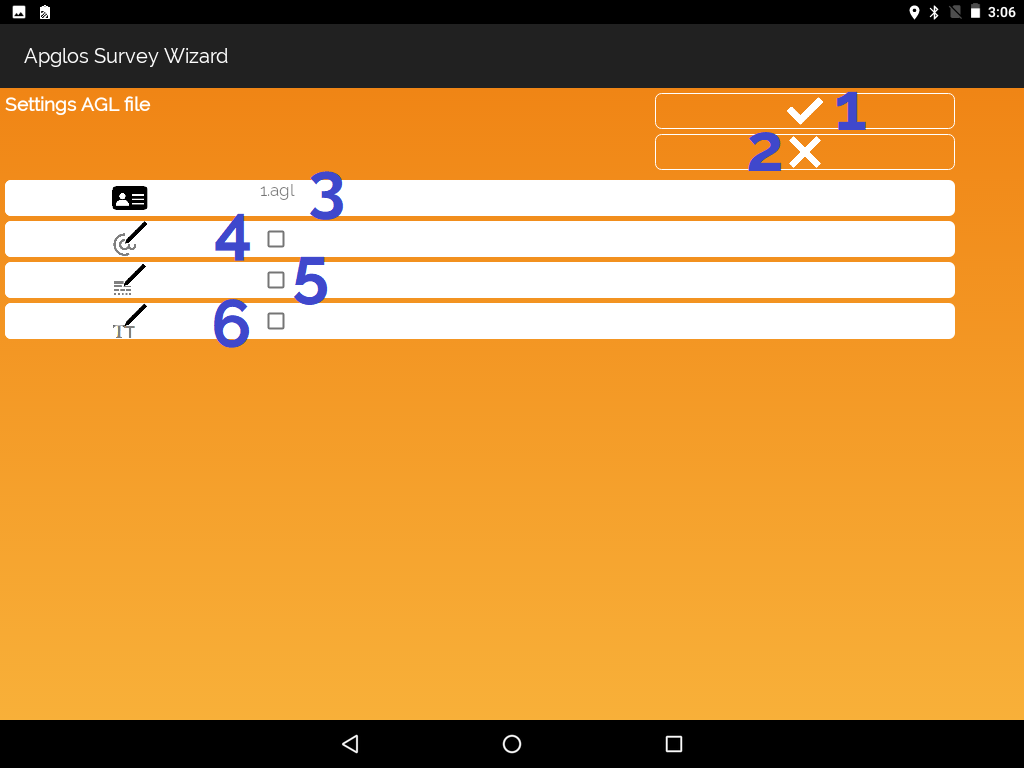
- OK button to open the file
- Cancel button to cancel opening the file
- File name
- Select this checkbox to overwrite current symbol files that are used for DXF files
- Checkbox to overwrite line types
- Checkbox to overwrite text styles
Screen to open CSV file
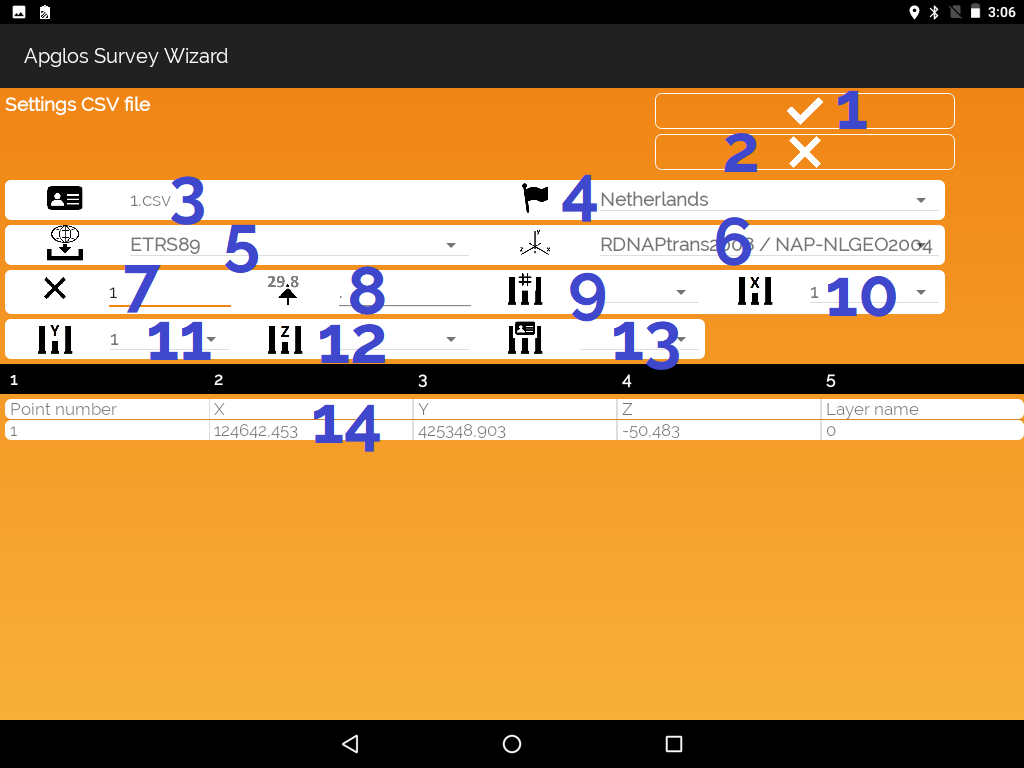
- OK button to open the file
- Cancel button to cancel opening the file
- File name
- Country selector
- Ellipsoid selector
- Coordinate system selector
- Multiplication factor
- Decimal sign
- Point number column selector
- Column selector for X-coordinate
- Y column selector
- Z column selector
- Layer name selector
- Columns with the data of the CSV file
Screen to open DXF file
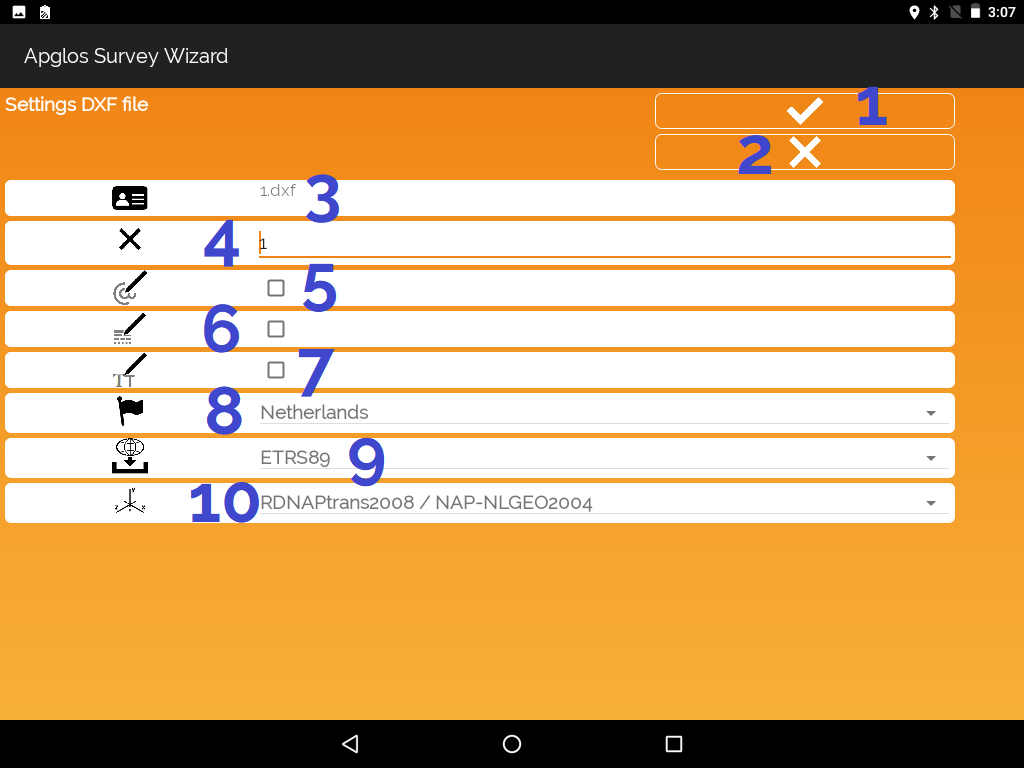
- OK button to open the file
- Cancel button to cancel opening the file
- File name
- Multiplication factor
- Select this checkbox to overwrite current symbol files that are used for DXF files
- Checkbox to overwrite line types
- Checkbox to overwrite text styles
- Country selector
- Ellipsoid selector
- Coordinate system selector
Screen to open TXT file
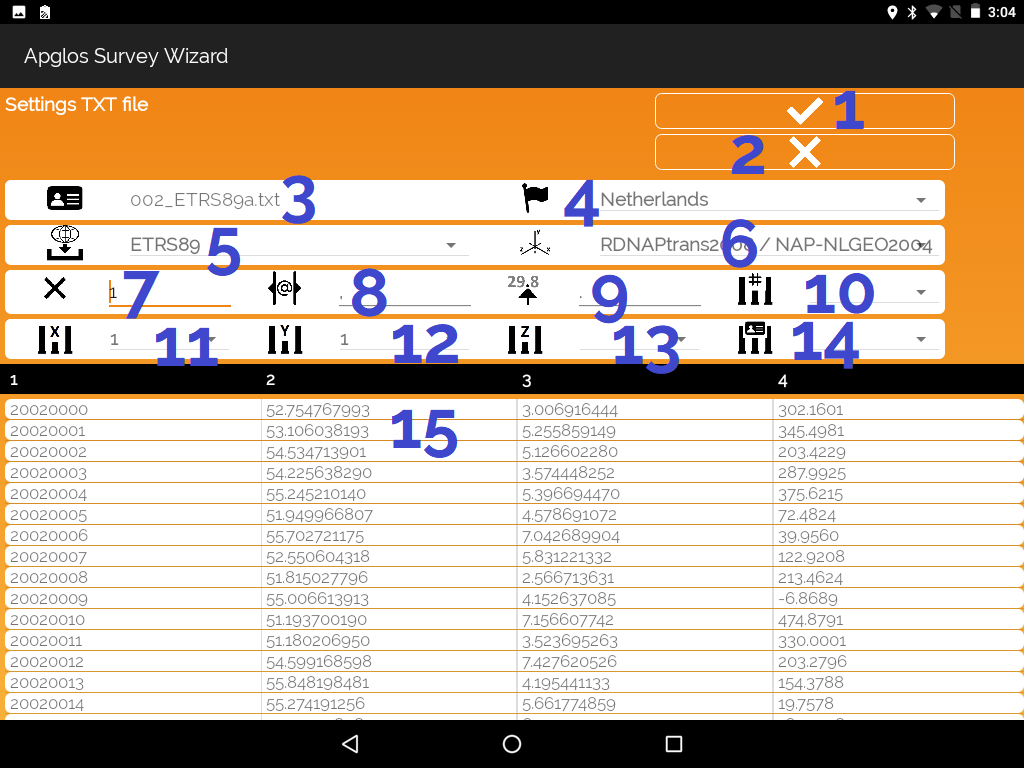
- OK button to open the file
- Cancel button to cancel opening the file
- File name
- Country selector
- Ellipsoid selector
- Coordinate system selector
- Multiplication factor
- Decimal sign
- Seperator sign between columns
- Point number column selector
- Column selector for X-coordinate
- Y column selector
- Z column selector
- Layer name selector
- Columns with the data of the TXT file
Screen to open XML file

- OK button to open the file
- Cancel button to cancel opening the file
- File name
- Multiplication factor
- Country selector
- Ellipsoid selector
- Coordinate system selector
Screen to open XYZ file
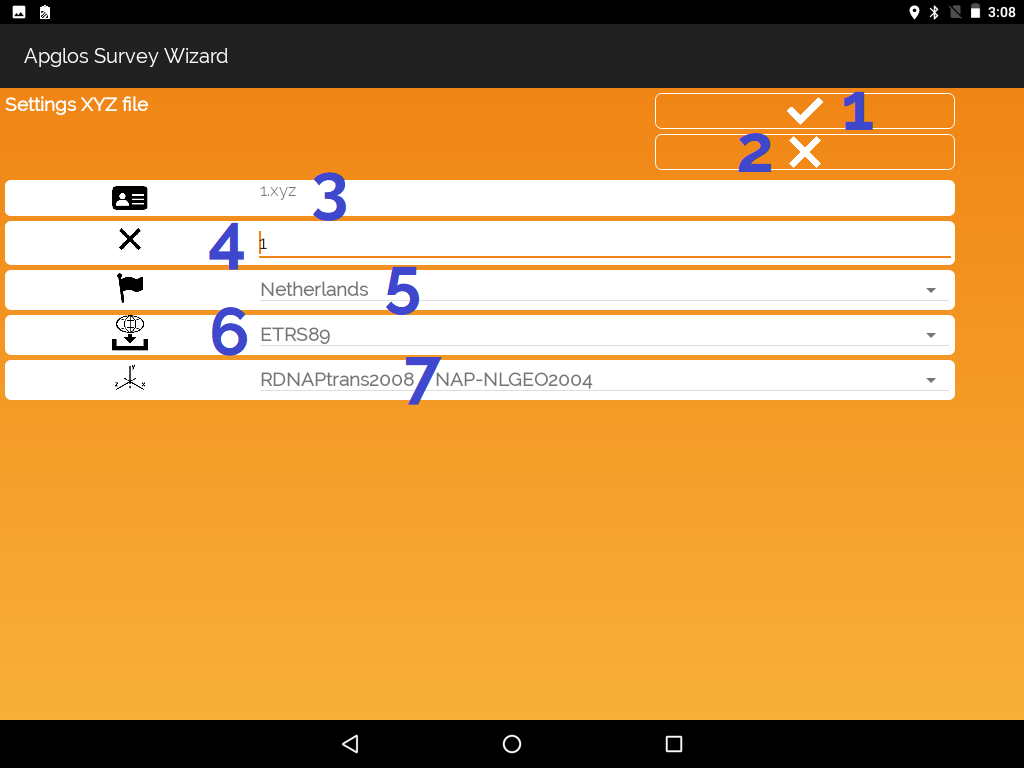
- OK button to open the file
- Cancel button to cancel opening the file
- File name
- Multiplication factor
- Country selector
- Ellipsoid selector
- Coordinate system selector
Save screen
General
In the save screen you can save the data of Apglos Survey Wizard in different file formats. When a different file type is chosen to save the data the Save screen changes.
Save AGL file screen

- OK button to save the data
- Cancel button to cancel saving the data
- Location to add the file name
- File type selector
- Checkbox to send the file right after saving by email or to put in the cloud, depending on the apps that are installed on the device
Save AGP file screen
AGP is a file format of Apglos that is a project file for GIS. So besides the AGP files also SHX, SHP, DBF and PRJ files will becreated when you save the data to a AGP file.
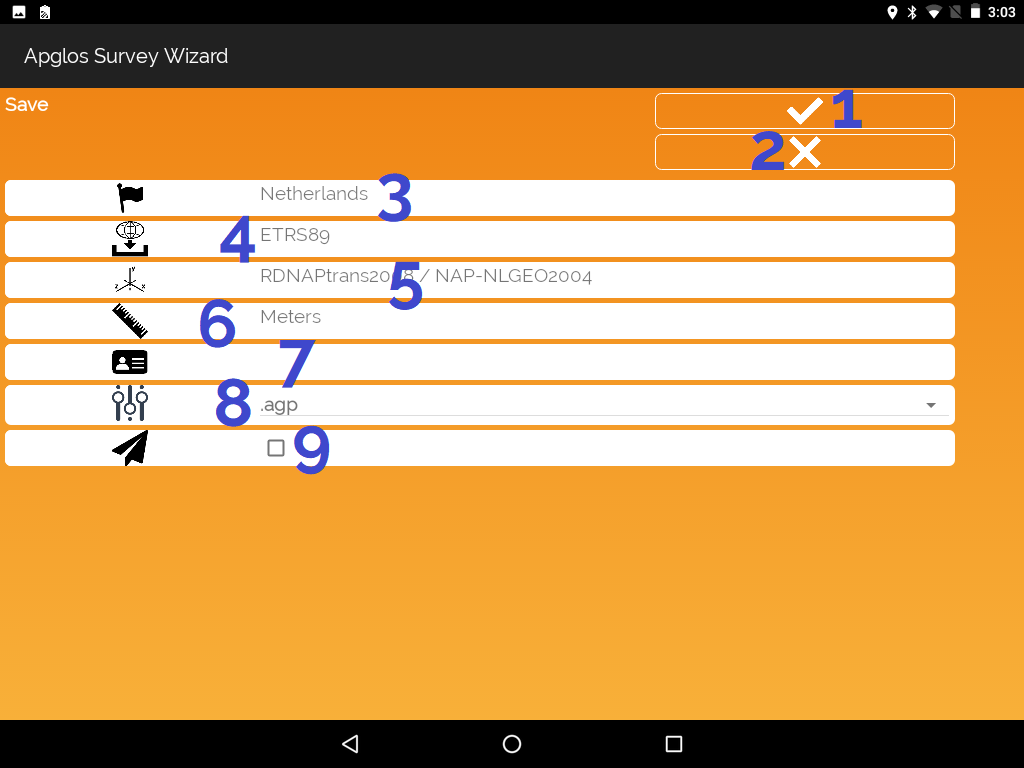
- OK button to save the data
- Cancel button to cancel saving the data
- Country, can only be changed in Settings screen
- Ellipsoid, can only be changed in Settings screen
- Coordinate system, can only be changed in Settings screen
- Units, can only be changed in Settings screen
- Location to add the file name
- File type selector
- Checkbox to send the file right after saving by email or to put in the cloud, depending on the apps that are installed on the device
Save ALC file screen
In an ALC file you can only save the base points that you use for your own localization.
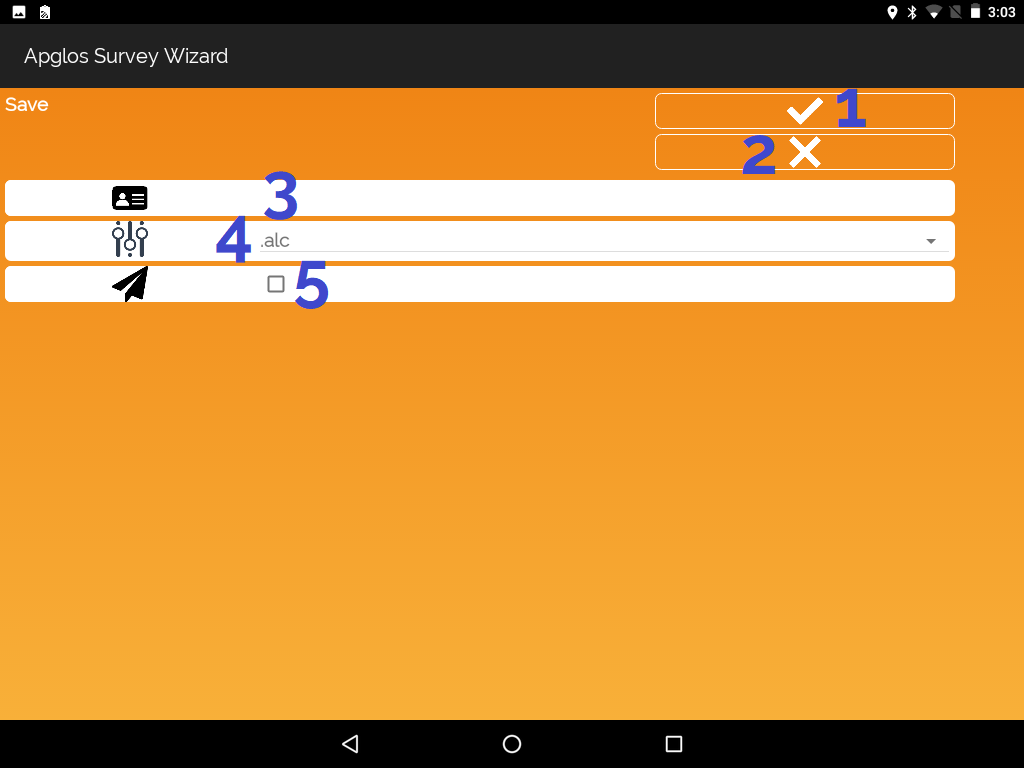
- OK button to save the data
- Cancel button to cancel saving the data
- Location to add the file name
- File type selector
- Checkbox to send the file right after saving by email or to put in the cloud, depending on the apps that are installed on the device
Save CSV file screen
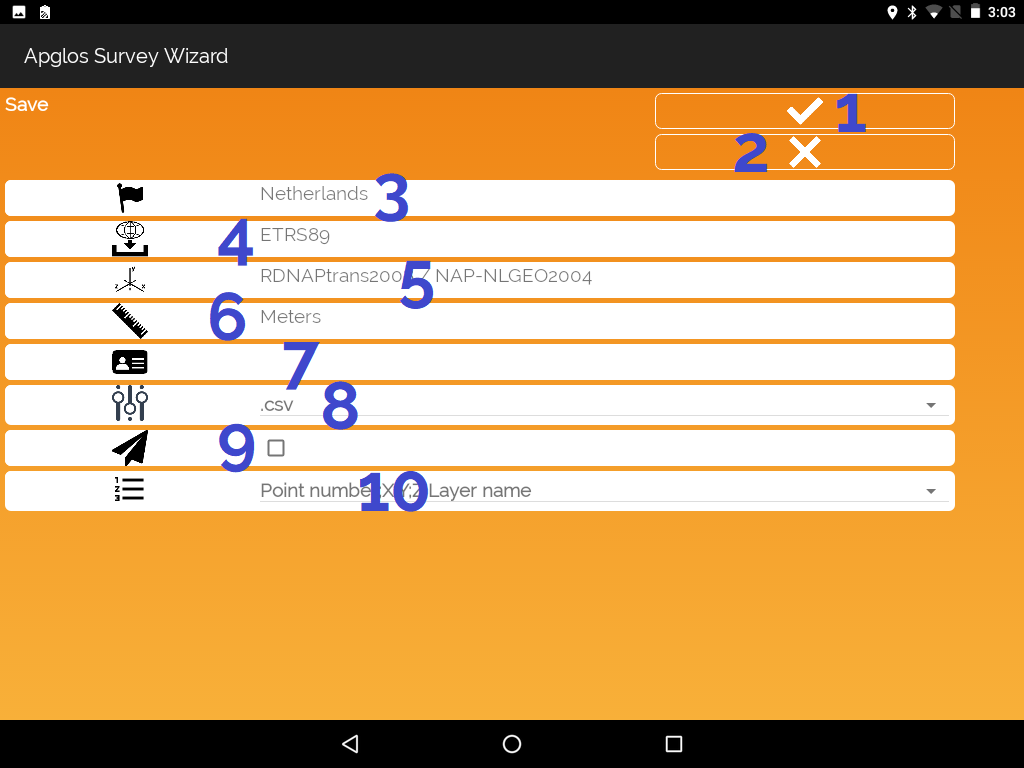
- OK button to save the data
- Cancel button to cancel saving the data
- Country, can only be changed in Settings screen
- Ellipsoid, can only be changed in Settings screen
- Coordinate system, can only be changed in Settings screen
- Units, can only be changed in Settings screen
- Location to add the file name
- File type selector
- Checkbox to send the file right after saving by email or to put in the cloud, depending on the apps that are installed on the device
- Selector of the data format in the CSV file
Save DXF file screen
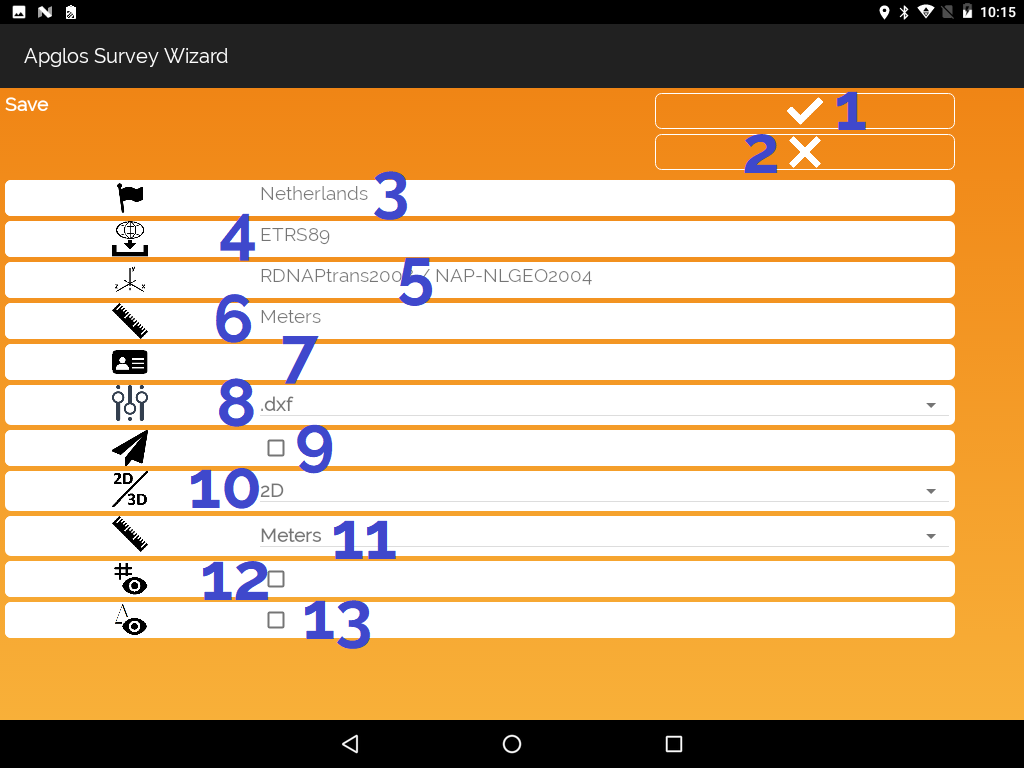
- OK button to save the data
- Cancel button to cancel saving the data
- Country, can only be changed in Settings screen
- Ellipsoid, can only be changed in Settings screen
- Coordinate system, can only be changed in Settings screen
- Units, can only be changed in Settings screen
- Location to add the file name
- File type selector
- Checkbox to send the file right after saving by email or to put in the cloud, depending on the apps that are installed on the device
- Dimension selector
- Units selector
- Checkbox for visibility of point numbers
- Checkbox for visibility of deviation of measurements
Save KML file screen
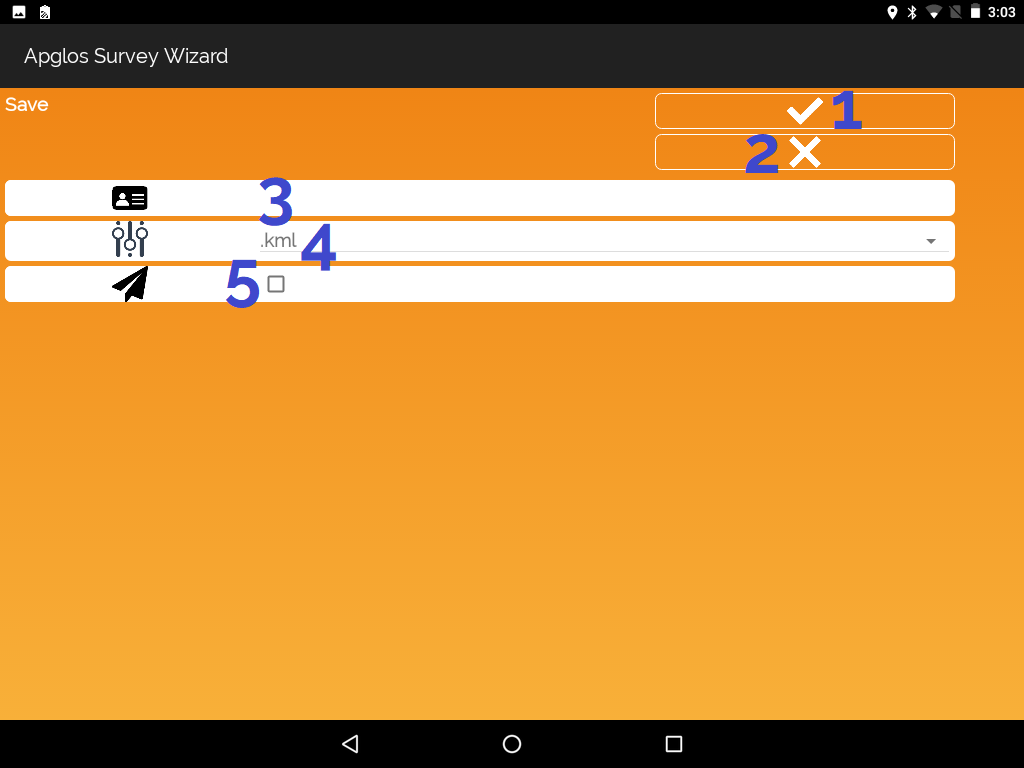
- OK button to save the data
- Cancel button to cancel saving the data
- Location to add the file name
- File type selector
- Checkbox to send the file right after saving by email or to put in the cloud, depending on the apps that are installed on the device
Save TXT file screen
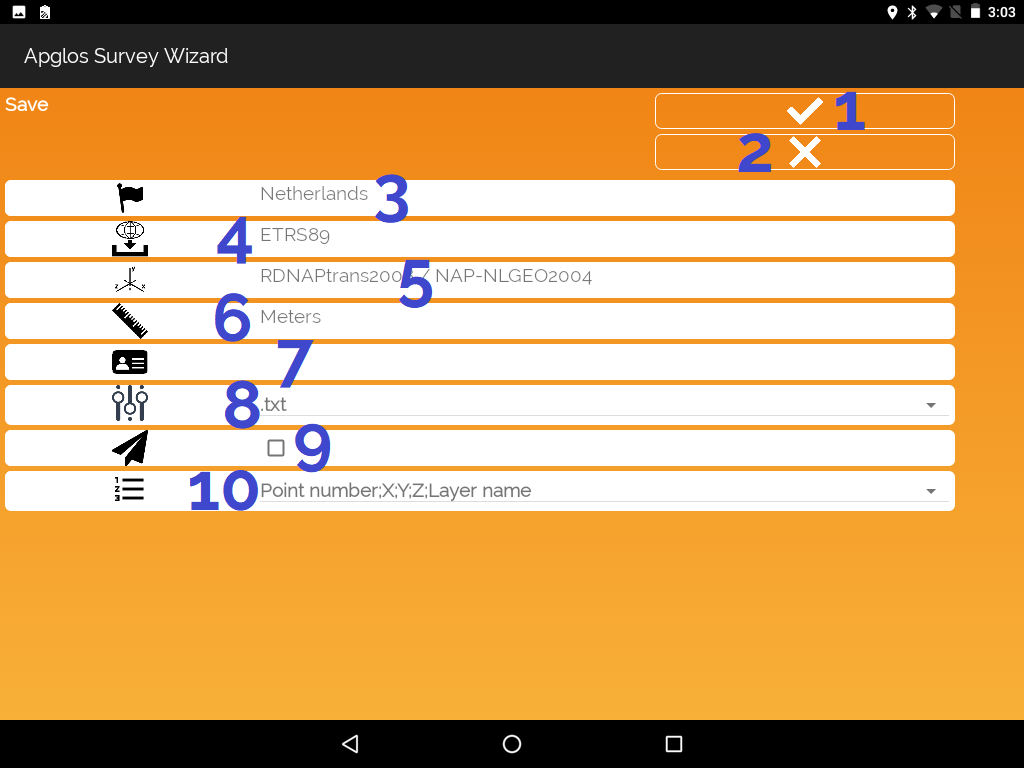
- OK button to save the data
- Cancel button to cancel saving the data
- Country, can only be changed in Settings screen
- Ellipsoid, can only be changed in Settings screen
- Coordinate system, can only be changed in Settings screen
- Units, can only be changed in Settings screen
- Location to add the file name
- File type selector
- Checkbox to send the file right after saving by email or to put in the cloud, depending on the apps that are installed on the device
- Selector of the data format in the TXT file
Save XML file screen
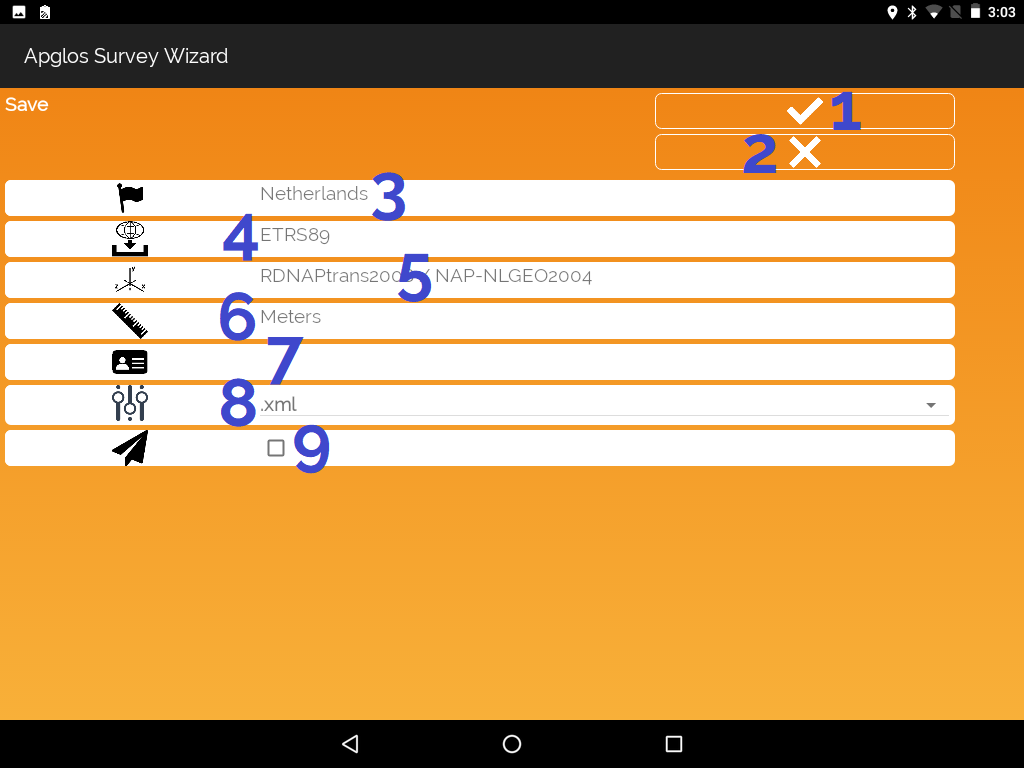
- OK button to save the data
- Cancel button to cancel saving the data
- Country, can only be changed in Settings screen
- Ellipsoid, can only be changed in Settings screen
- Coordinate system, can only be changed in Settings screen
- Units, can only be changed in Settings screen
- Location to add the file name
- File type selector
- Checkbox to send the file right after saving by email or to put in the cloud, depending on the apps that are installed on the device
Save XYZ file screen
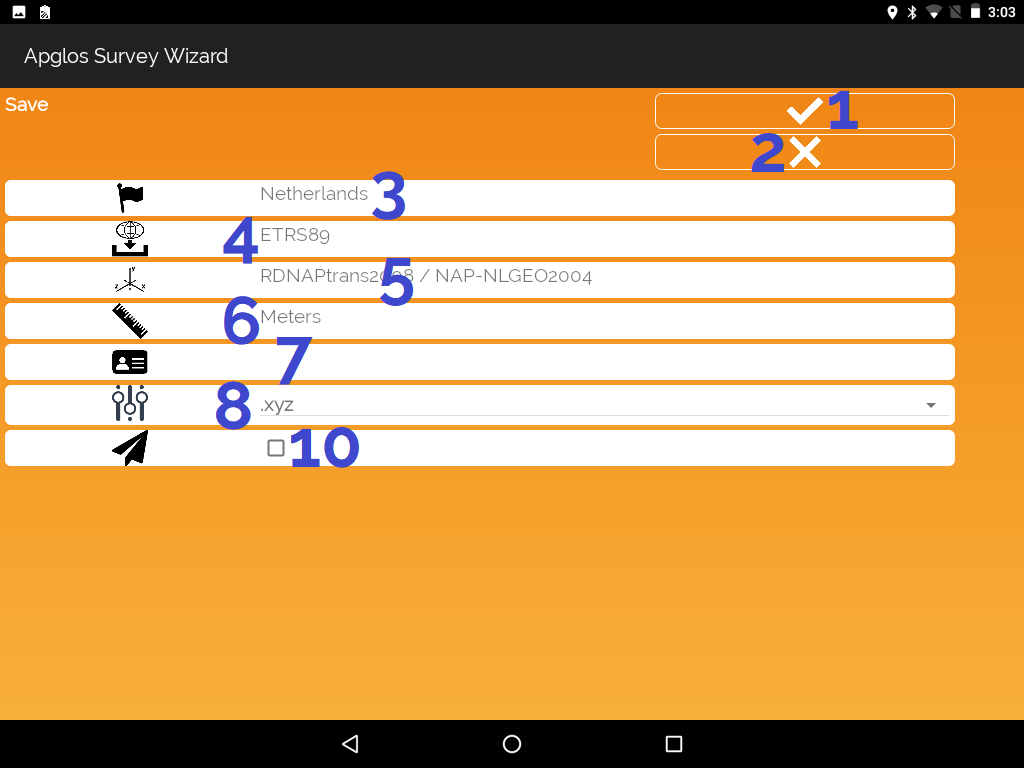
- OK button to save the data
- Cancel button to cancel saving the data
- Country, can only be changed in Settings screen
- Ellipsoid, can only be changed in Settings screen
- Coordinate system, can only be changed in Settings screen
- Units, can only be changed in Settings screen
- Location to add the file name
- File type selector
- Checkbox to send the file right after saving by email or to put in the cloud, depending on the apps that are installed on the device
Import file screen
Imported files are shown by Apglos Survey Wizard as a layer. You can’t select the elements of the file.
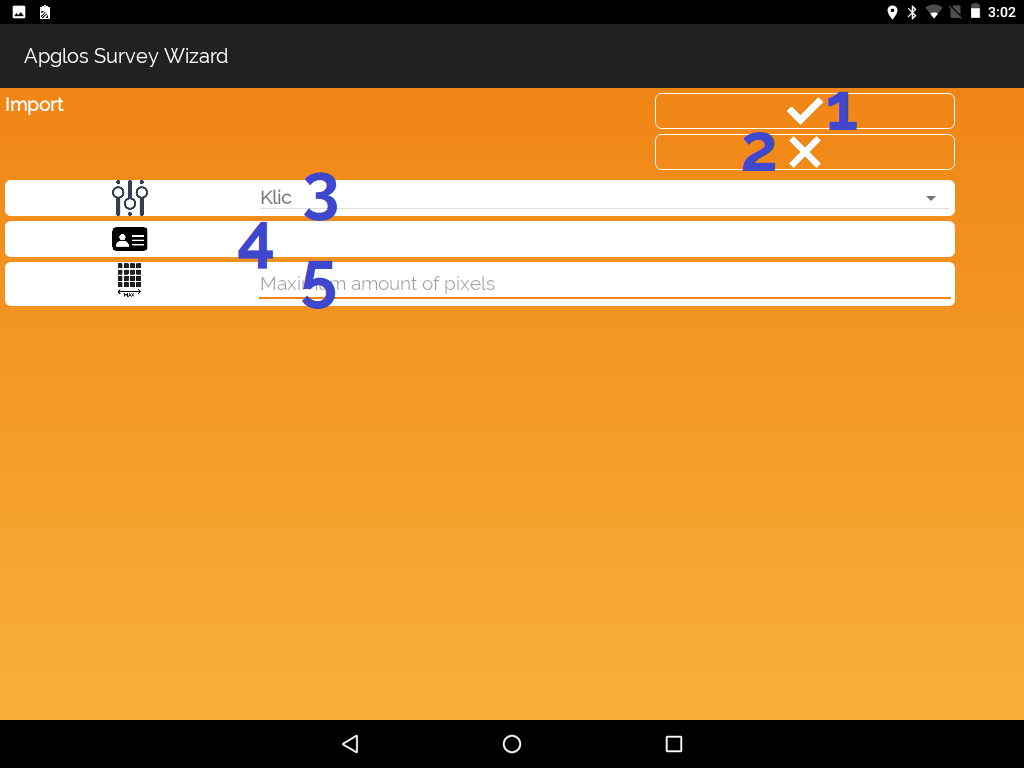
- OK button to import the file
- Cancel button to cancel
- Type of data to import
- Click here to go to the Open screen to select the file
- The maximum amount of pixels to be used for the file in relation to the memory of the device
Settings screen
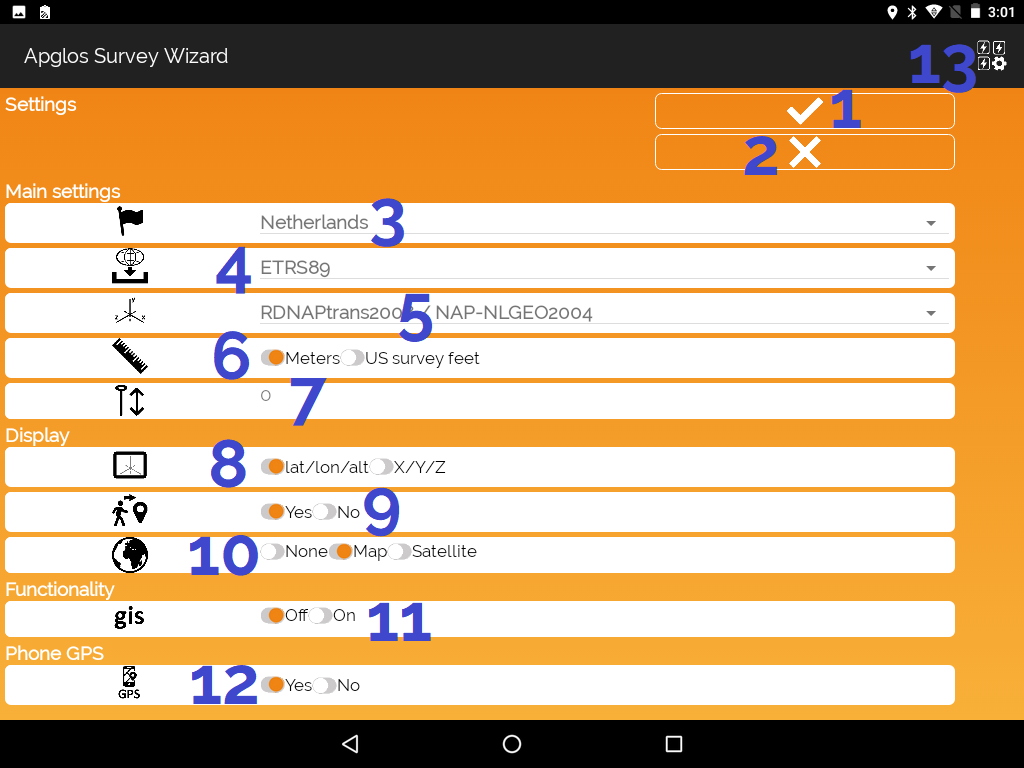
- Confirm button to confirm changes
- Cancel button to go back
- Option to change the country
- Changing ellipsoid option
- Option to change coordinate reference system
- Choice of units that are used
- Click here to change the antenna height
- Option to select the way the coordinates are shown
- Selection if the map has to be centered on the position you are
- Map layout selector
- Select here to turn on or off GIS data
- Option to select if you can use your phone for surveying
- Click here to go to the Quick button screen
Quick button screen
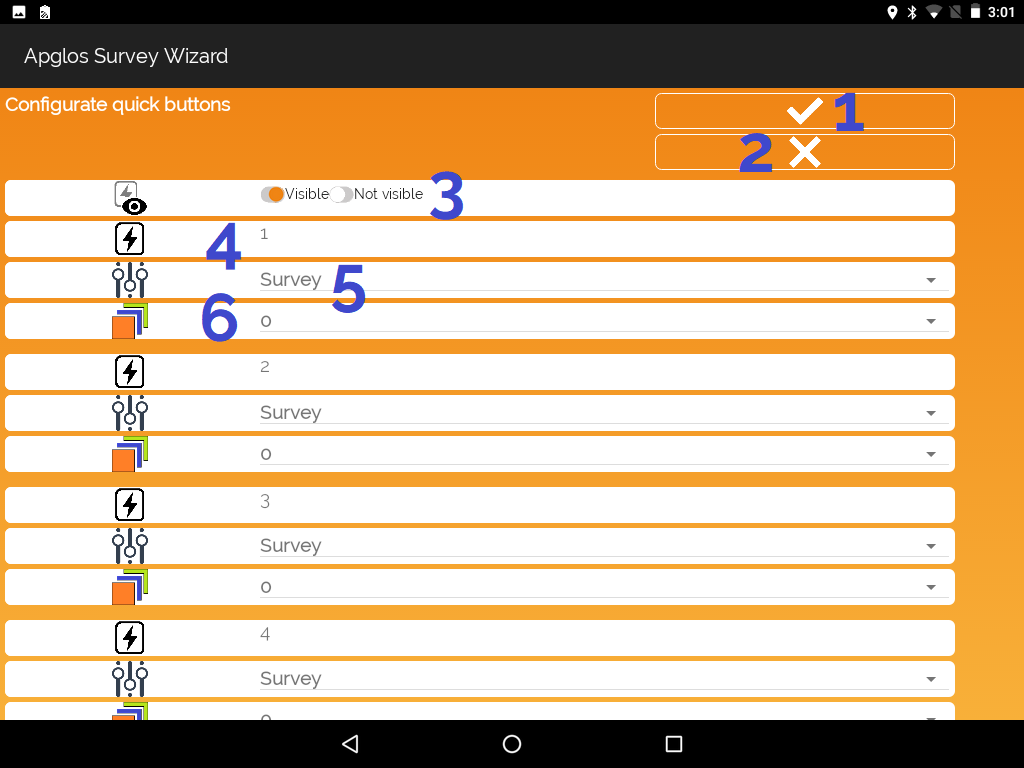
- Confirmation button
- Cancelation button
- Set the visibility of the quick buttons
- Number of quick button (in total there is the possibility of 10 quick buttons)
- Method selector for quick button (survey, line, arc, polyline, polygon, comment, block)
- Layer selector of quick button
Screen menu
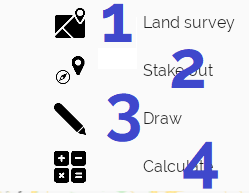
- Option to go to the Land survey screen
- Click here to go to the Stake out screen
- Option to go to the Draw screen
- Click here to go to the Calculate screen
Land survey screen
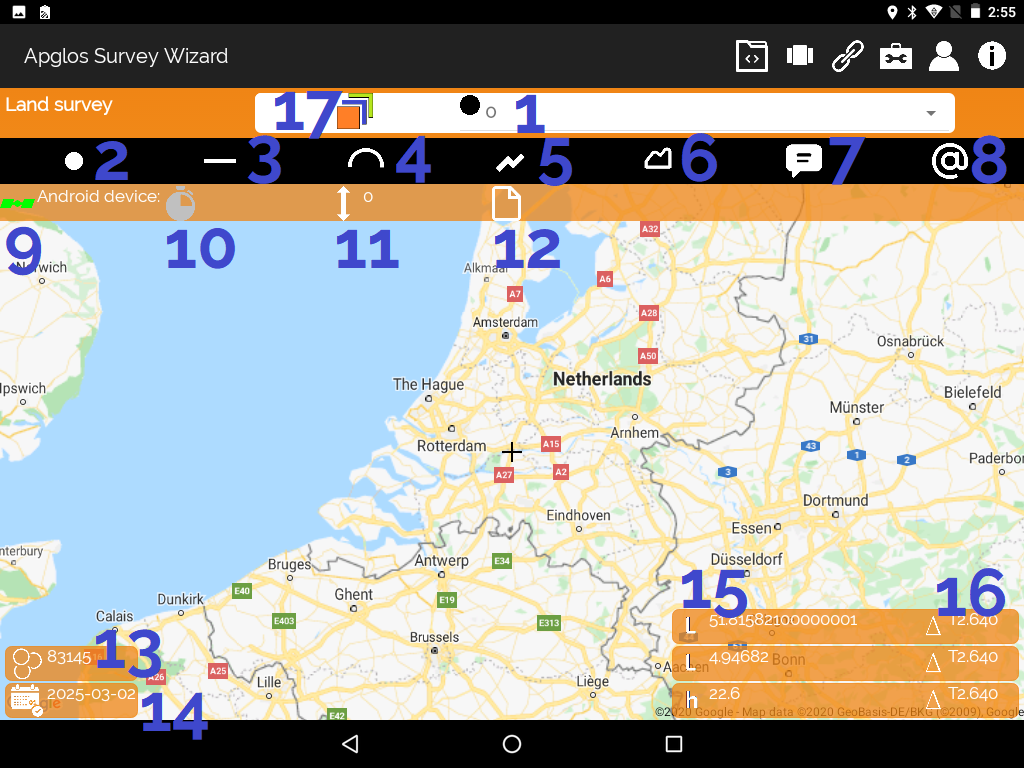
- Layer selector
- Button to land survey a point
- Click here to survey a line (a point needs to be selected)
- Button to survey an arc (a line has to be selected)
- Click here to survey a polyline (a point, line or polyline needs to be selected)
- Button to survey a polygon (a polyline or polygon needs to be selected)
- Click here to place a comment after that you will go to the Comment screen
- Button to place a symbol after that you will go to the Symbol screen
- Indicator of your accuracy of your position. When it is green you can use the buttons on this screen
- Indicator if there is a connection with the NTRIP caster
- The height of the antenna that has been set in the Settings screen
- The file name of the current data
- Amount of coins
- The last date of your license. If it is 0000-00-00 or 0001-01-01 than Apglos Survey Wizard uses your coins
- The current position shown in the way you selected in the Settings screen
- Deviation of the current position
- Button to go to the Layer manager screen
Comment screen

- Confirmation button
- Cancellation button
- Location to add your comment
- Selector of font for the output in DXF
- Size of font for the output in DXF
Symbol screen
- Confirmation button
- Cancellation button
- Symbol name selector (symbols are imported when you open a DXF file with blocks)
- Rotation of the symbol for the output in DXF
- Scale of the symbol for the output in DXF
- Menu item that will take you to the attributes screen when there are attributes to fill in the symbol
Layer manager screen
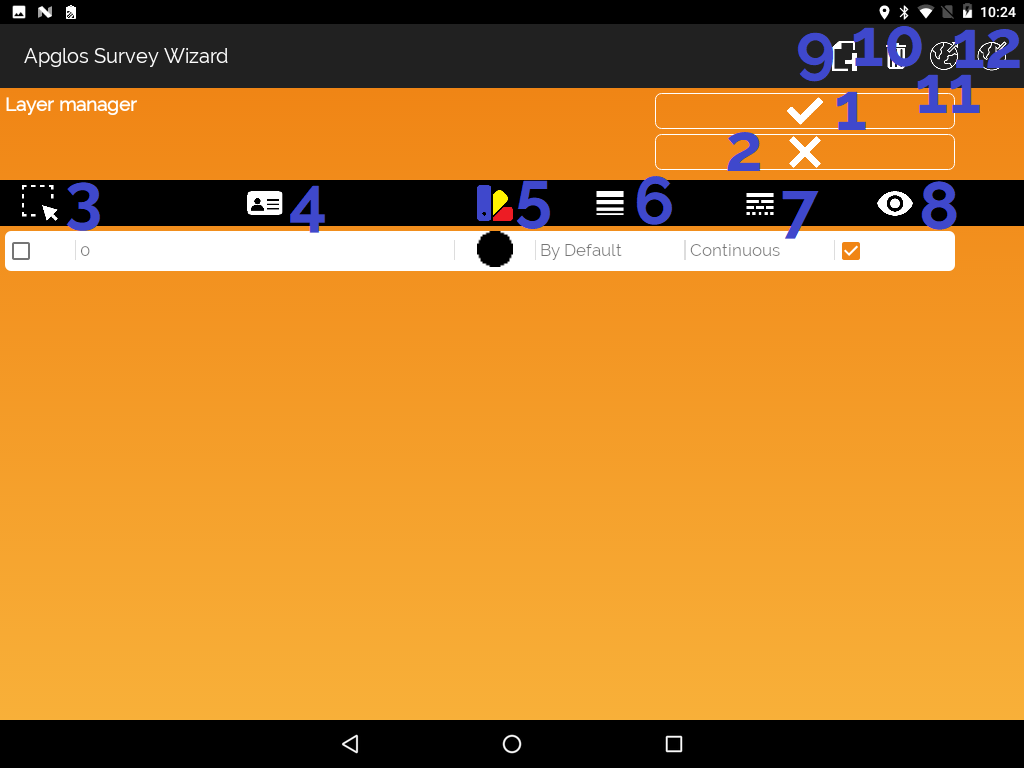
- Confirmation button
- Cancelation button
- Selected layers column
- Layer name column
- Color of layer column
- Line weight column
- Line type column
- Visibility of layer column
- Button to go to the Add layer screen
- Menu item to delete the selected layers
- Button to go to the Export layers screen for exporting layers
- Menu item to go to the Import layers screen for importing layers
Add layer screen
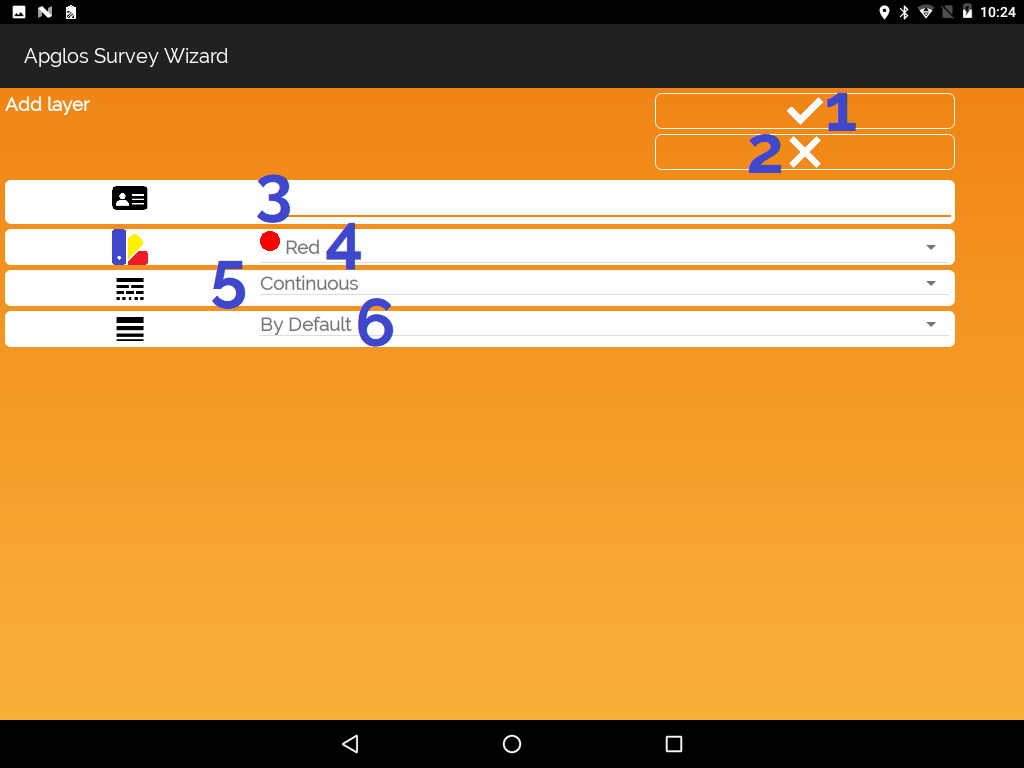
- Confirmation button
- Cancelation button
- Location to add the layer name
- Color of the layer selector
- Line type selector
- Line weight selector
Export layers screen
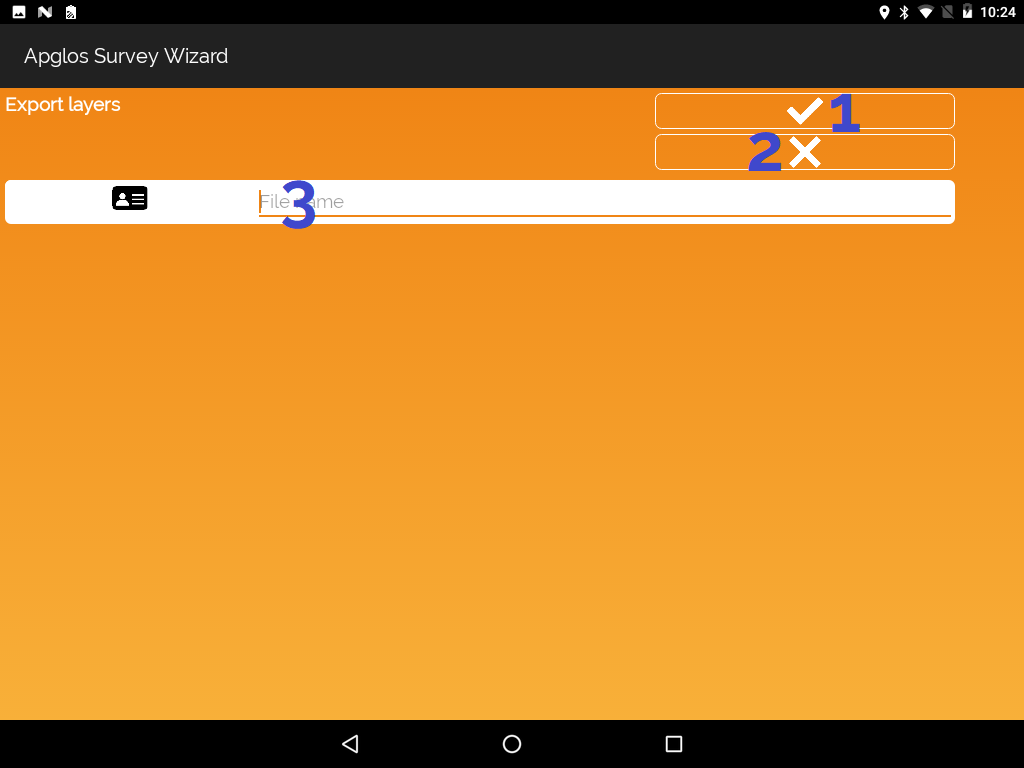
- Confirmation button
- Cancelation button
- Location to add the file name of the exported layer file
Import layers screen
- Button to go back to main screen
- Name of current folder
- Files in current folder. Click on the desired file to import the layers from
Stake out screen

- Selector of the point to stake out
- Selector to stake out horizontally or vertically (only matters for the beep sound being at the correct position)
- Coordinates of the point to stake out
- Horizontal direction to the point to stake out (works if there is a compass sensor in your Android device)
- Horizontal distance to point to stake out
- Vertical distance to point to stake out
- Confirmation button that point has been staked out. It will add a square around the point
- Creating snappoints of line element.
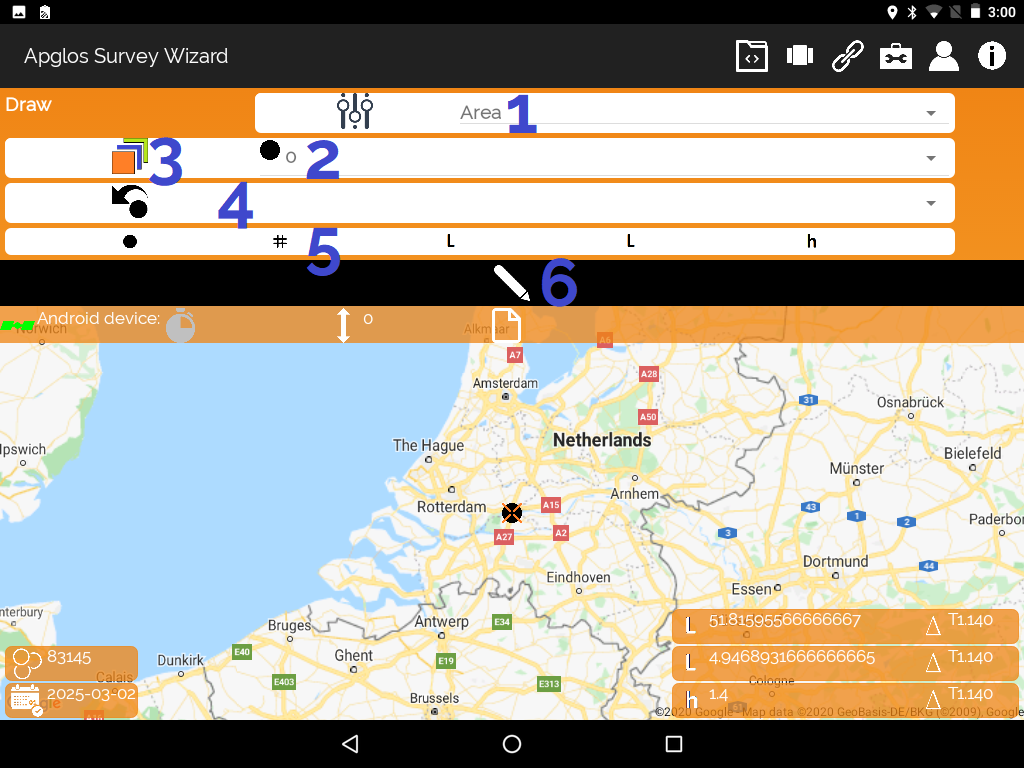
Draw screen
Enter point option
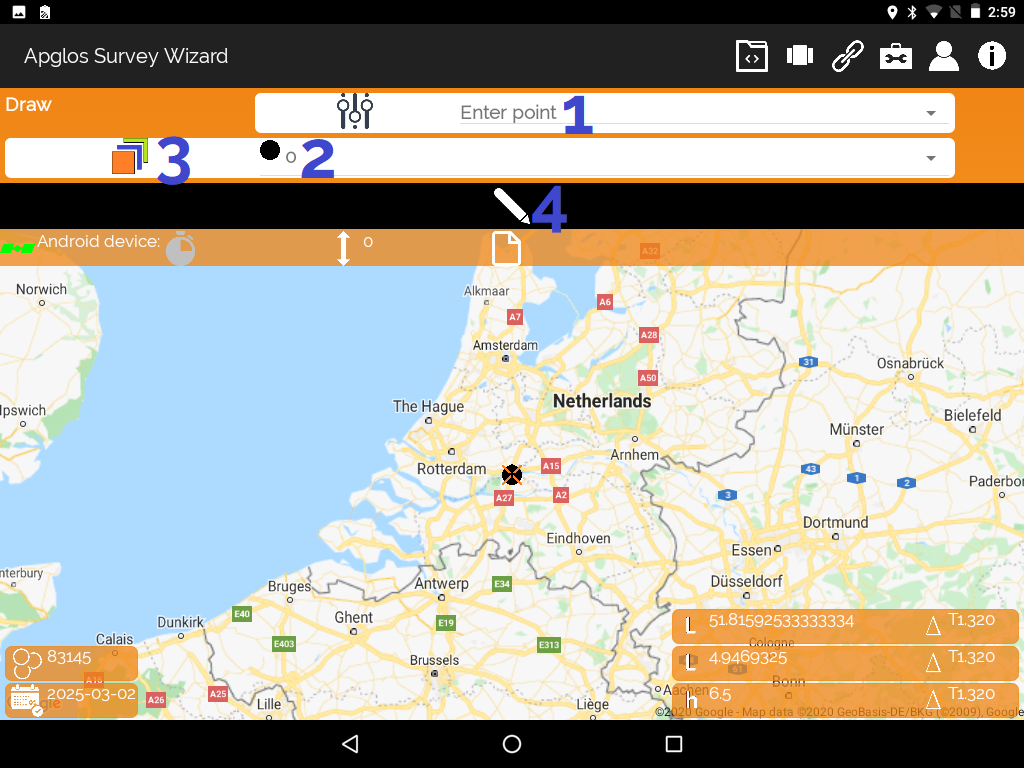
- Draw method selector
- Layer selector
- Button to go to the Layer manager screen
- Draw button that will take you to the Enter point screen
Draw line option
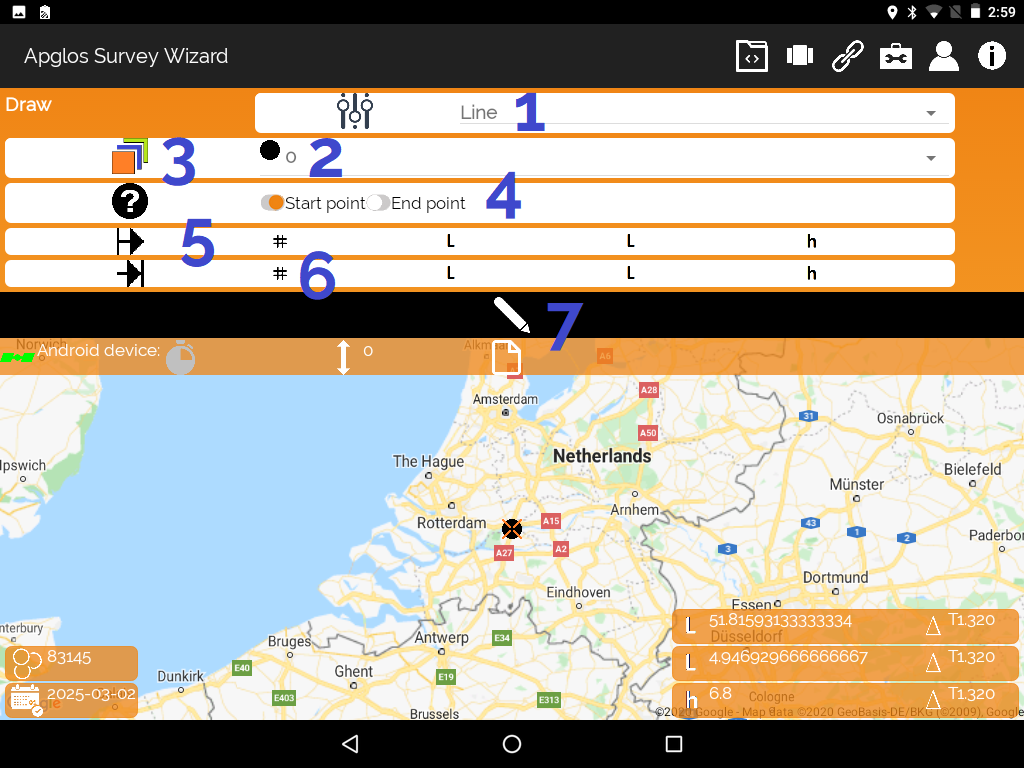
- Draw method selector
- Layer selector
- Button to go to the Layer manager screen
- Type of point for selection
- Data of start point
- Data of end point
- Button to draw the line
Draw arc option
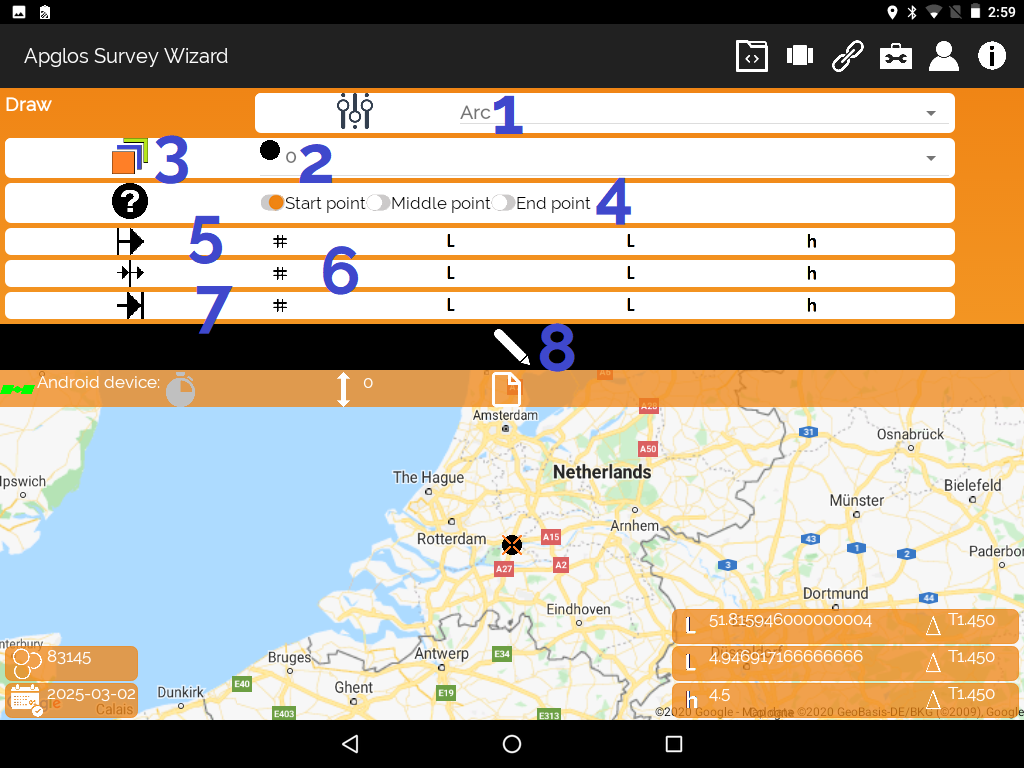
- Draw method selector
- Layer selector
- Button to go to the Layer manager screen
- Type of point for selection
- Data of start point
- Data of mid point
- Data of end point
- Button to draw the arc
Draw polyline option

- Draw method selector
- Layer selector
- Button to go to the Layer manager screen
- Choice of before which snappoint the point has to be added
- Data of point to add to the polyline
- Button to add the point to the selected polyline
*Make sure a polyline is selected
Draw polygon option
- Draw method selector
- Layer selector
- Button to go to the Layer manager screen
- Choice of before which snappoint the point has to be added
- Data of point to add to the polygon
- Button to add the point to the selected polygon
*Make sure a polygon is selected
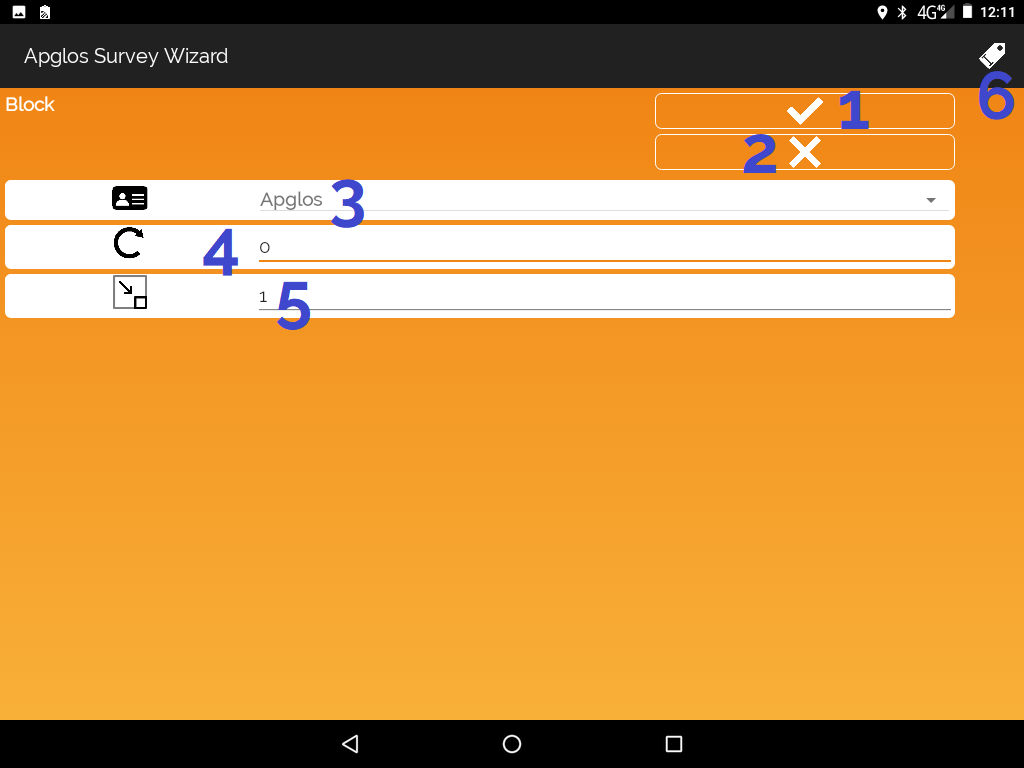
Change attributes screen
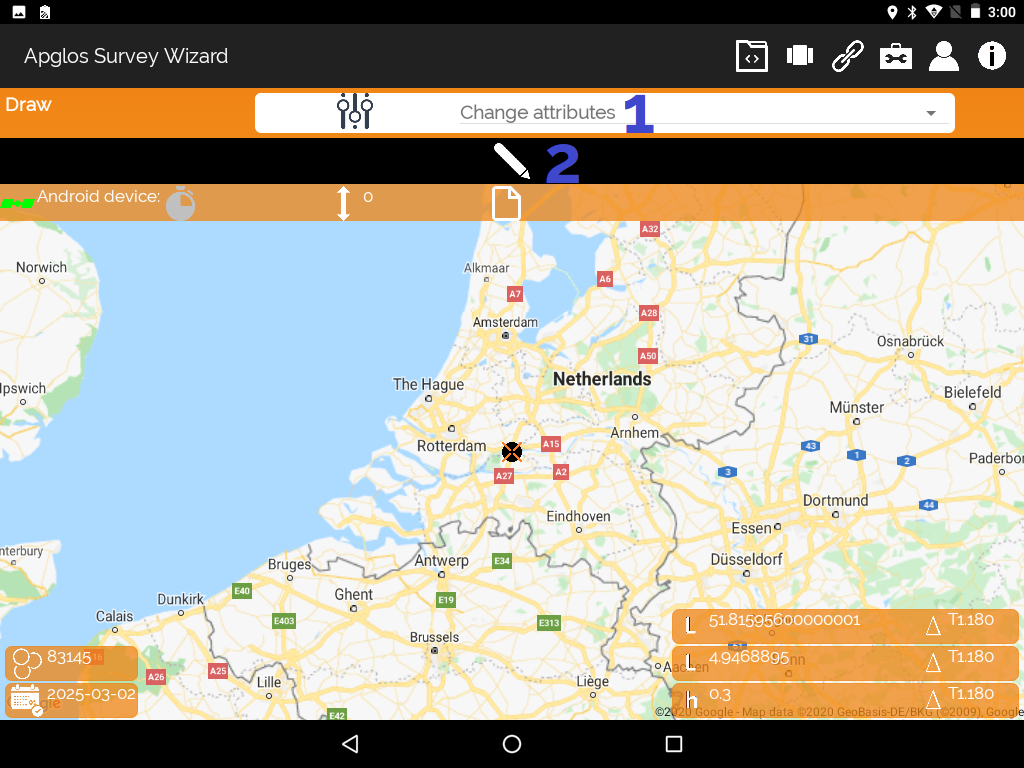
- Draw method selector
- Draw button to change the attributes of an element. It will show the Fill in attributes screen
Adjust point option
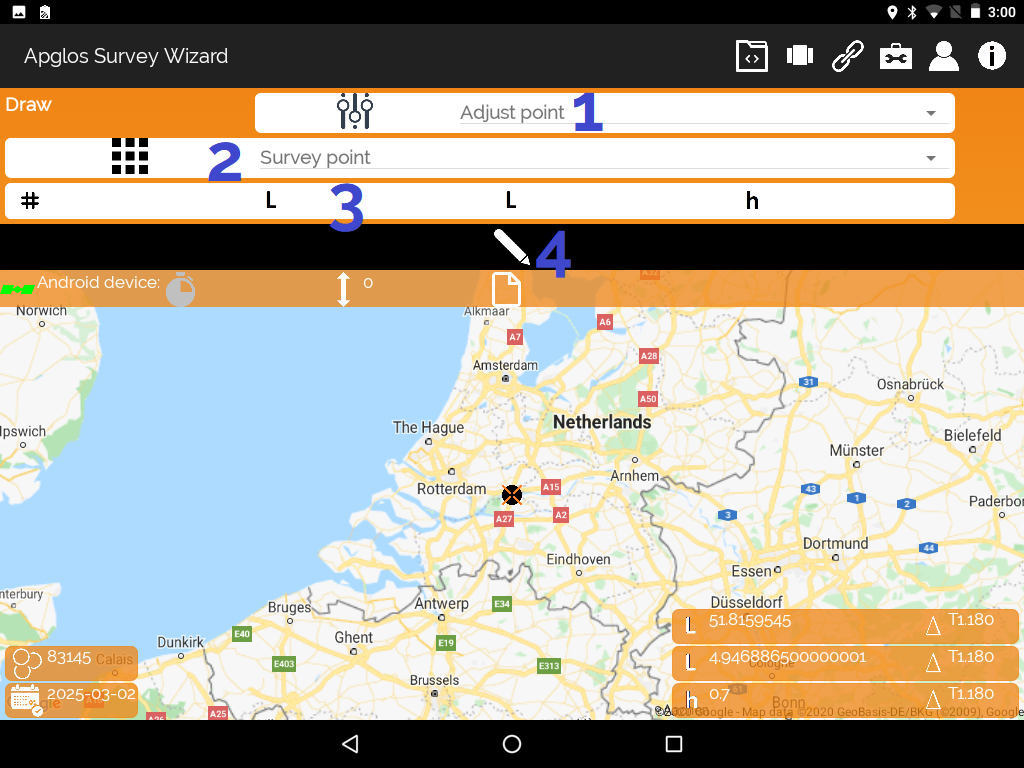
- Draw method selector
- Selector of what the point has to become (Survey point, comment, symbol)
- Data of the selected point
- Button to change the point
Adjust height option

- Draw method selector
- Draw button to change the height of the point. It will show the Fill in value screen
Extend option

- Draw method selector
- Fill in here the distance that the element has to be extended with
- Selector of part that the element has to be extended from
- Draw button to extend the selected line element
Offset screen
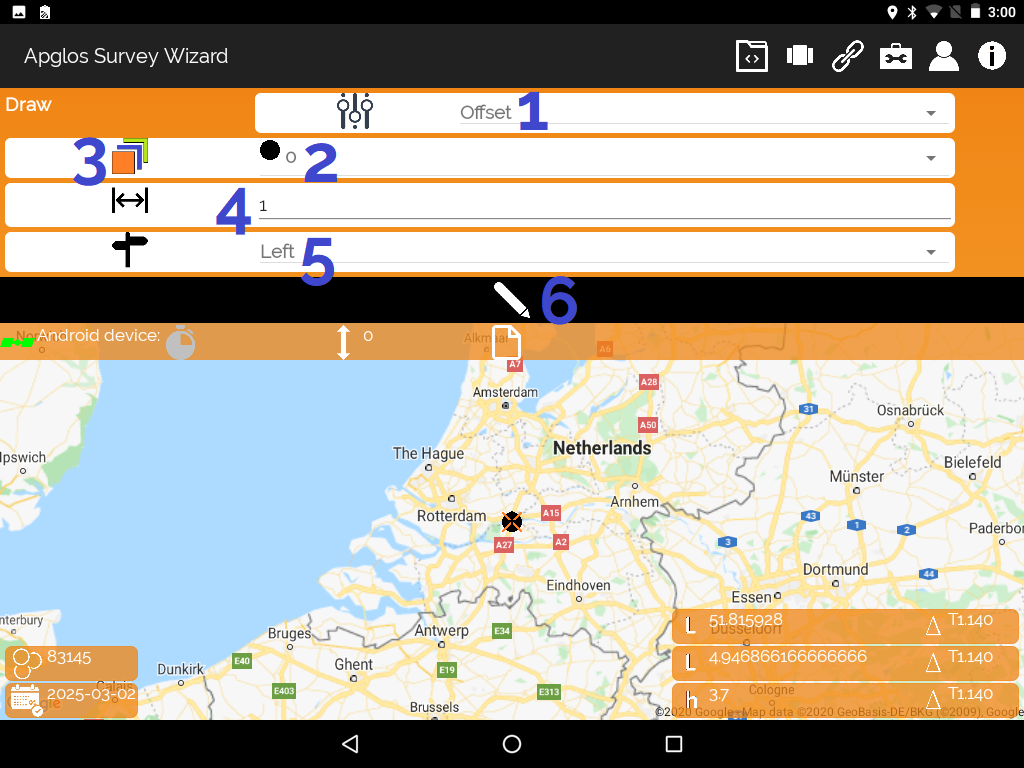
- Draw method selector
- Layer selector
- Button to go to the Layer manager screen
- Fill in here the distance that the element has to be offsetted with
- Selector of part that the element has to be offsetted to
- Button to offset the selected line element
Calculate screen
Calculate coordinate option

- Calculation method selector
- Calculation button to calculate the X-, Y- and Z-coordinates of the selected point
Count option
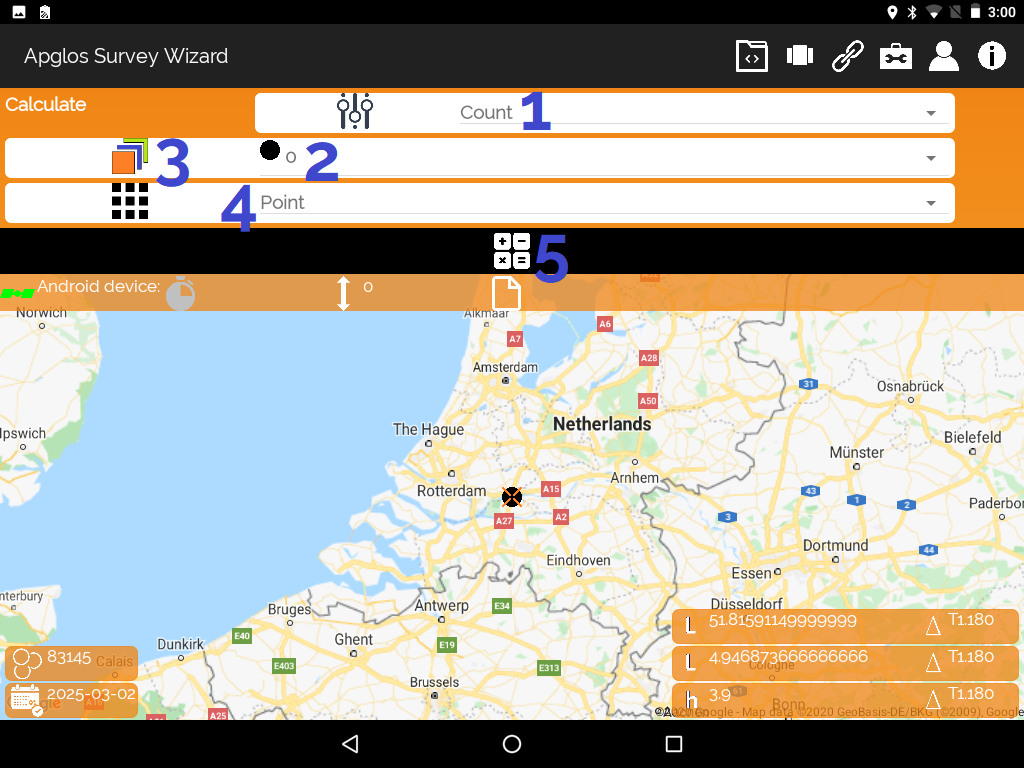
- Calculation method selector
- Layer selector
- Button to go to the Layer manager screen
- Selector of the type of elements that need to be counted
- Calculation button to count the elements
Calculate distance option

- Calculation method selector
- Type of point for selection
- Data of start point
- Data of end point
- Button to calculate the distance
Calculate height difference option
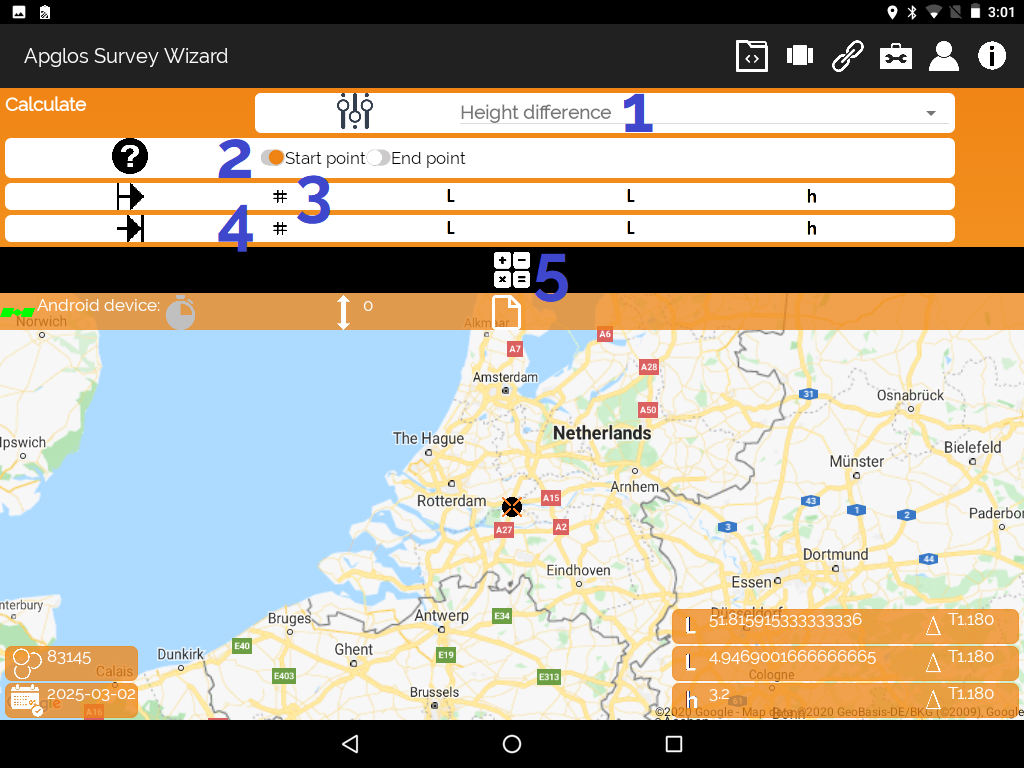
- Calculation method selector
- Type of point for selection
- Data of start point
- Data of end point
- Button to calculate the height difference
Calculate length option
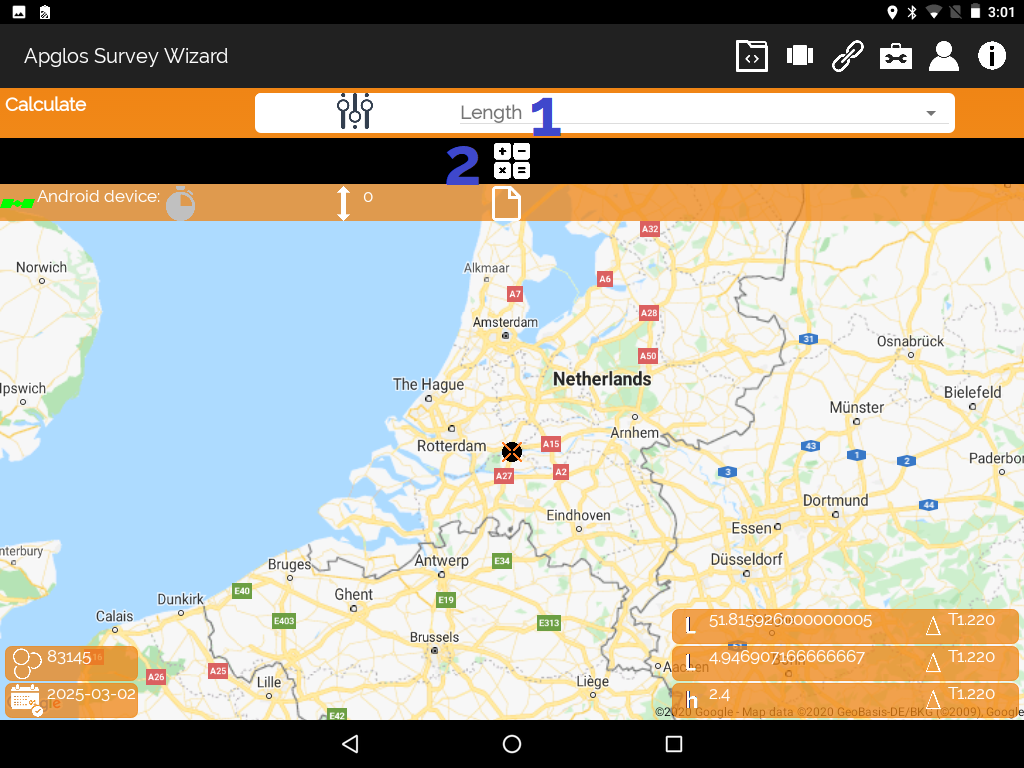
- Calculation method selector
- Button to calculate the length of a selected line element
Calculate area option

- Calculation method selector
- Button to calculate the area of a selected polygon
Calculate volume option

- Calculation method selector
- Selector of the method of volume calculation
- If in 2 is chosen for From level then there is here the location to fill in the height of the level
- Button to calculate the volume of a selected polygon
Connection menu
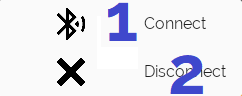
- Menu item that will take you to the Connection screen
- Button to disconnect with any GNSS receiver
Connection screen
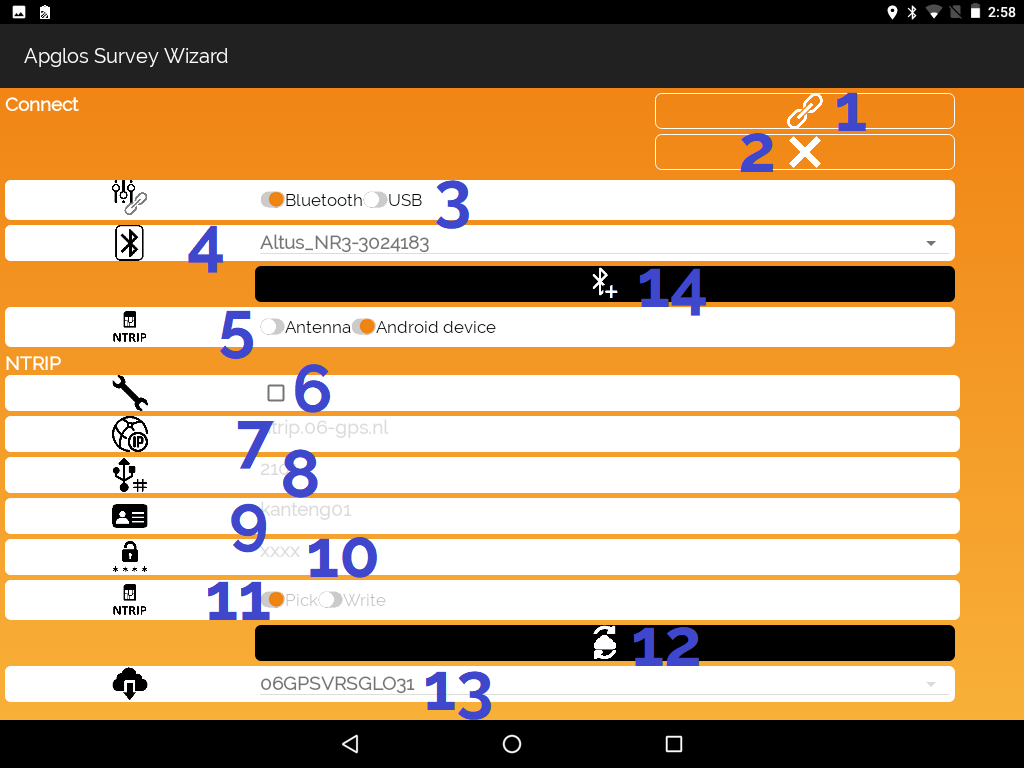
- Button to connect
- Cancelation button
- Choice of connection with GNSS reciever
- Selector of Bluetooth GNSS receiver devices
- Selector of where the correction data is communicated by
- Checkbox to unlock filling in the NTRIP data
- Location to fill in the IP address
- Box to fill in the port number
- Box to fill in the username
- Location to fill in the password
- Selector to pick or manually write the mountpoint
- Button to refresh the mountpoints
- Mountpoint selector
- Button to add a bluetooth device that leads to the Add Bluetooth device screen
Add bluetooth device screen
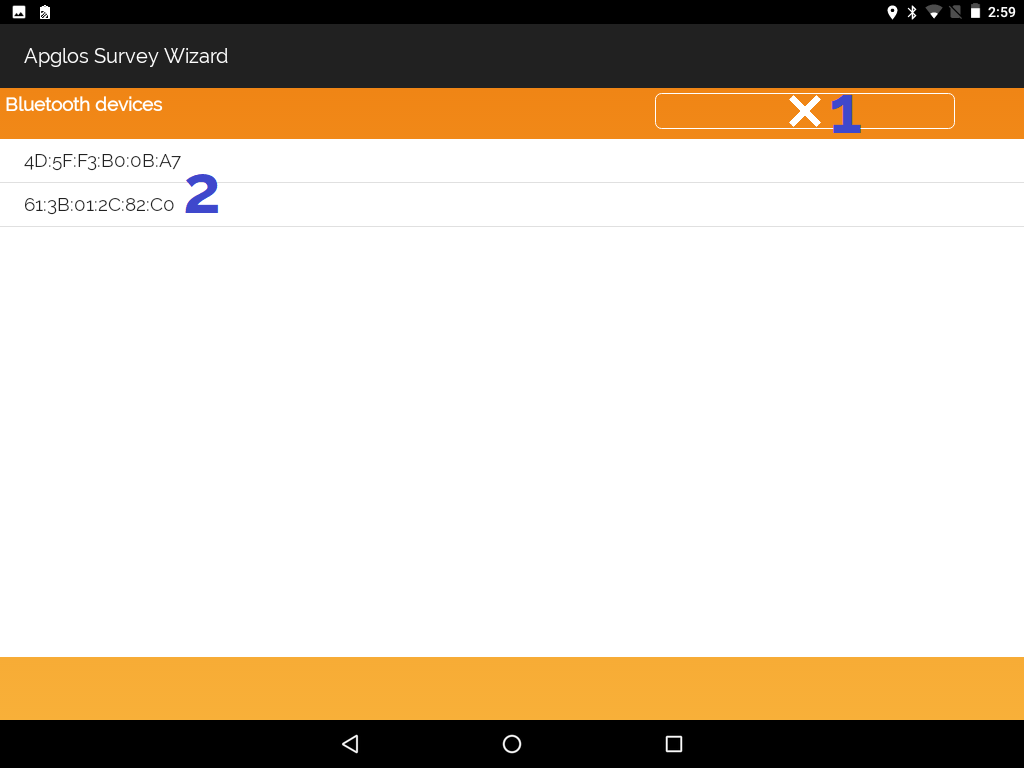
- Cancelation button
- List of all found Bluetooth devices
Toolbox menu
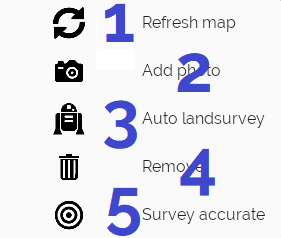
- Menu item to refresh the map
- Button to add a photo to the selected item. Clicking on this will lead you to the Add photo screen
- Option to auto landsurvey. Clicking on this will lead you to the Auto landsurvey screen
- Button to remove the selected item
- Option to survey more accurate. This option can be used while land surveying and staking out.
Add photo screen
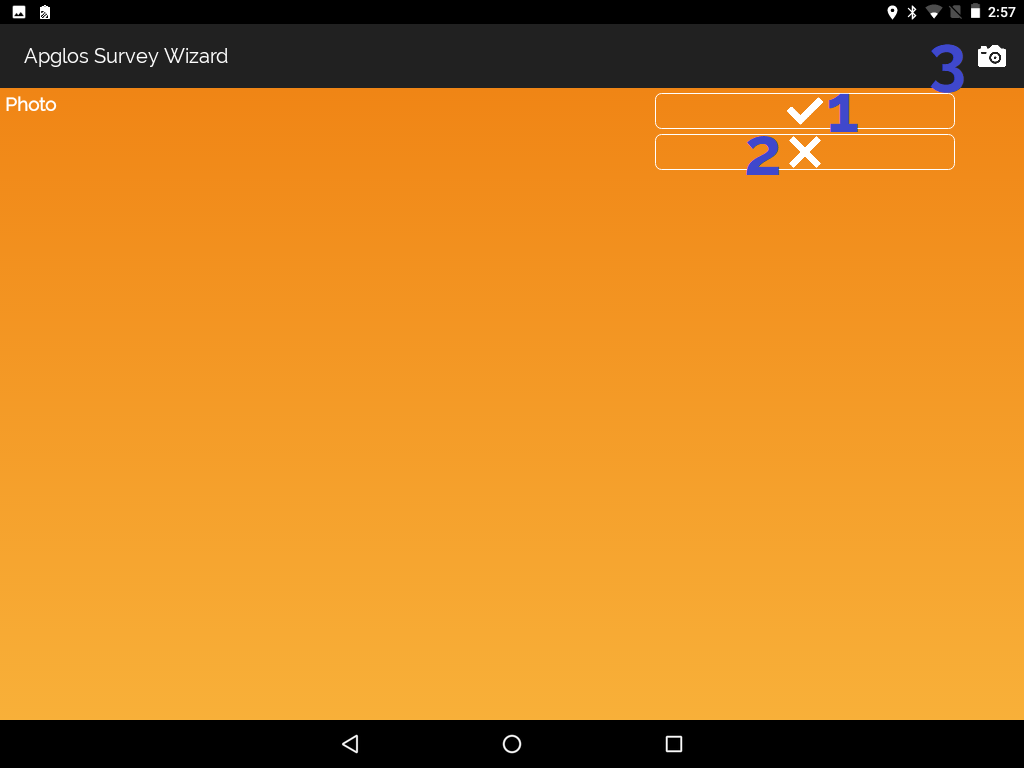
- Confirmation button
- Cancellation button
- Menu item to take a photo of the item
Auto land survey screen
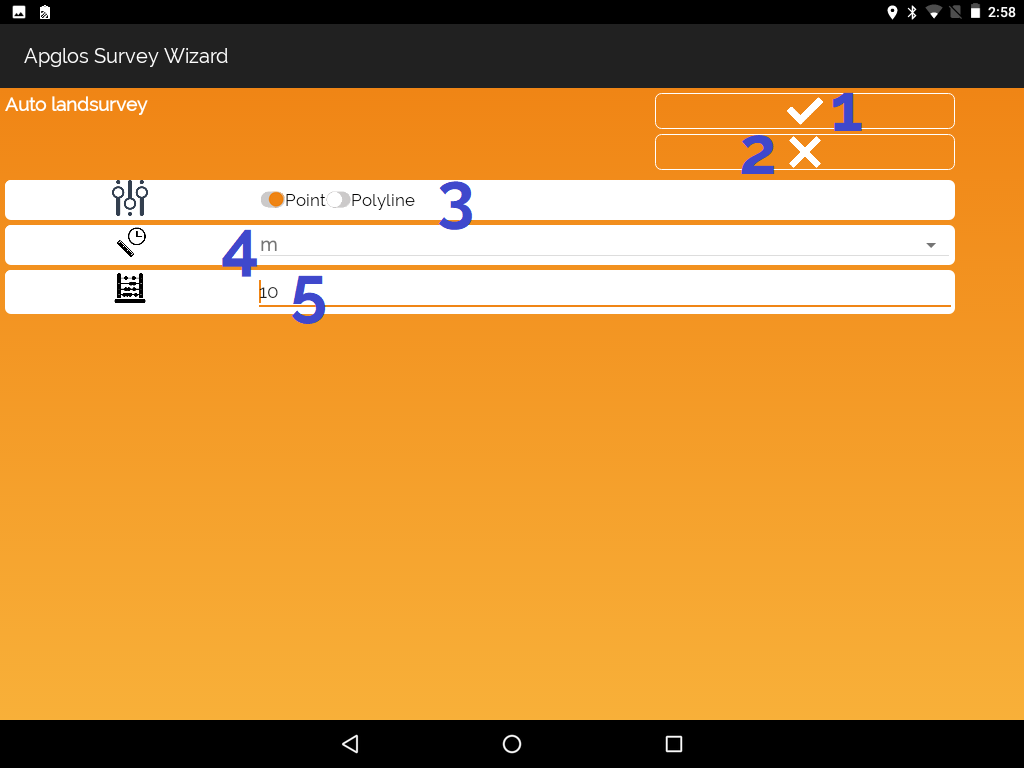
- Confirmation button
- Cancellation button
- Option selector of what element you want as result of auto land surveying
- Unit selector
- Here is to fill in the quantity of the units for every measurement
Profile menu
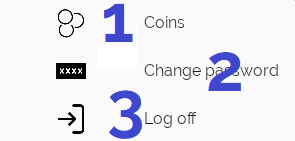
- Menu item to go to your coins and license data. It will lead to the Coins screen
- Option to change your password. It will lead to the Change password screen
- Button to log off Apglos Survey Wizard
Coins screen
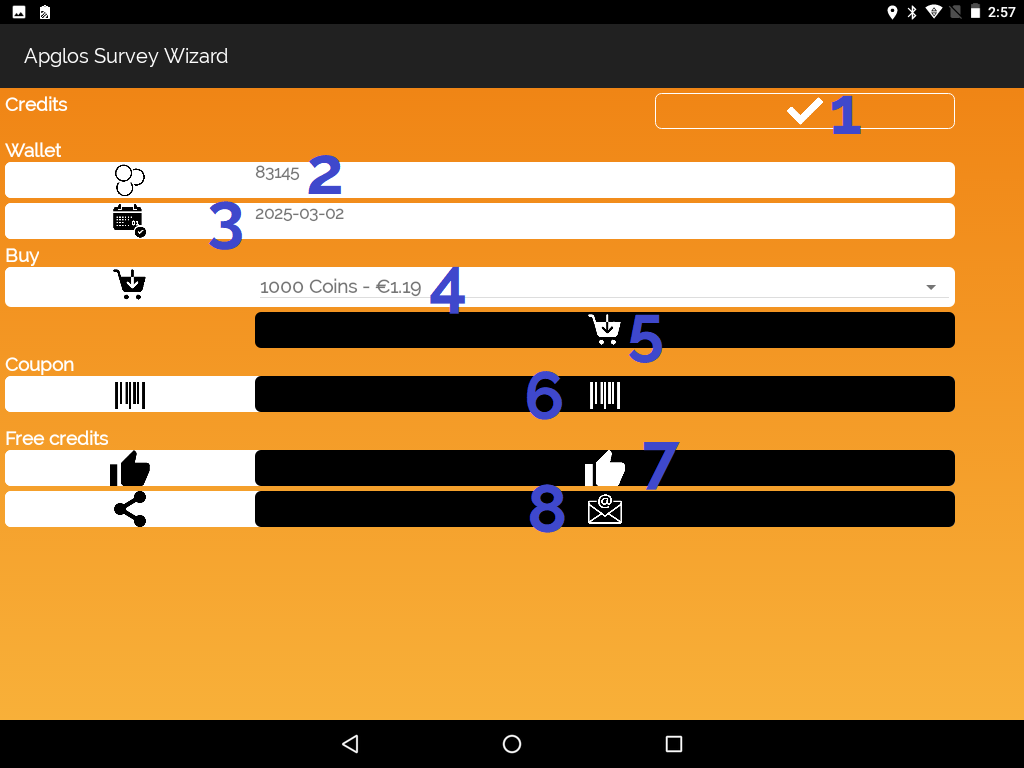
- Confirmation button
- Amount of coins
- Expiring date of license
- Coins amount selector to purchase coins within the app
- Button to buy the amount of couns selected at number 4
- Coupon button that leads you to the Coupon screen
- The rate button, for a good rating you get 1000 free coins
- Share by email button will lead you to the Share screen
Coupon screen
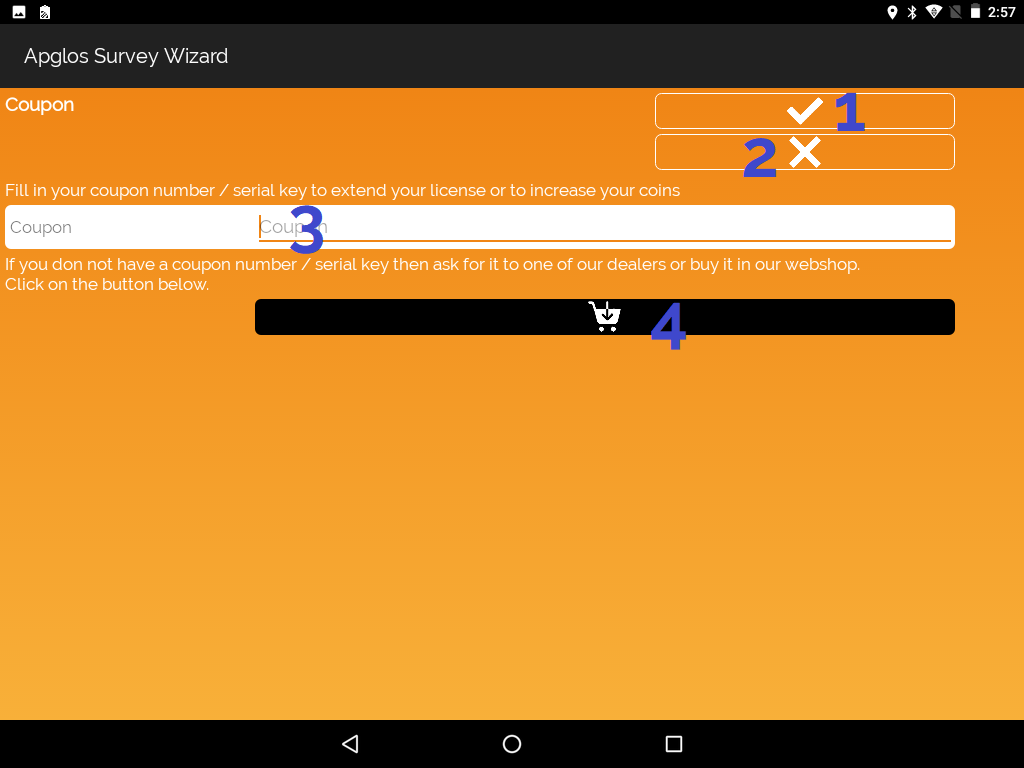
- Confirmation button
- Cancellation button
- Location to fill in your coupon number
- Button that will lead you to our webshop where you can buy the coupons
Share screen
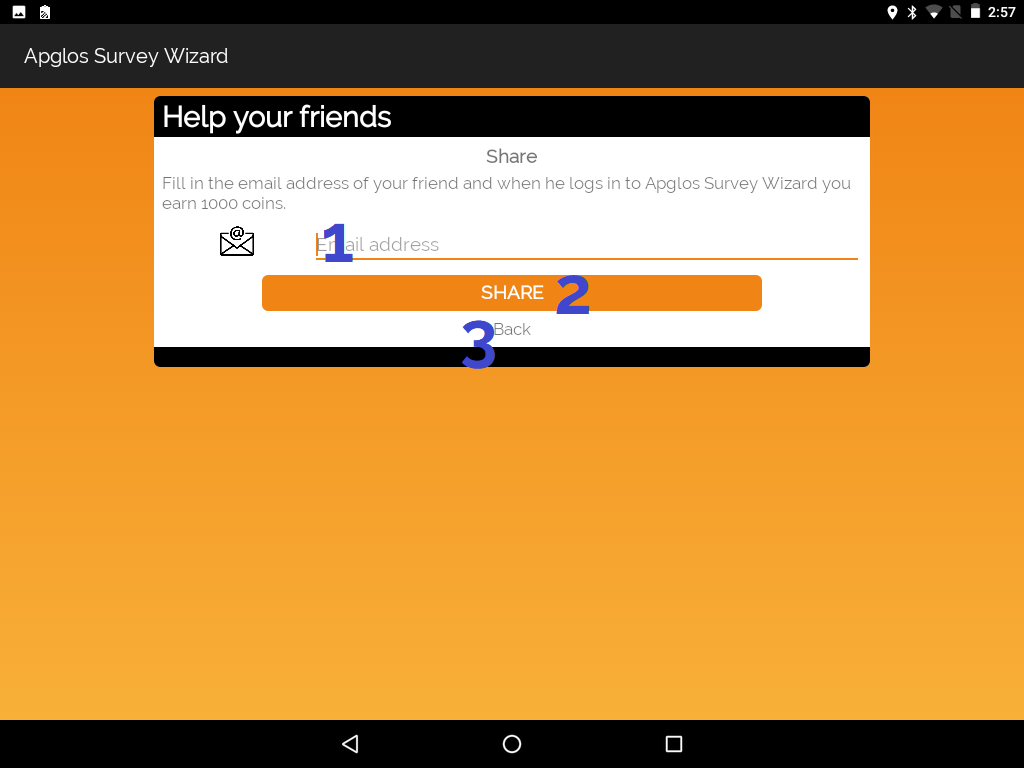
- Location to fill in the email address of your friend of colleague
- Button to share Apglos Survey Wizard. An email will be send to the email address you filled in at 1
- Option to go back
Change password screen
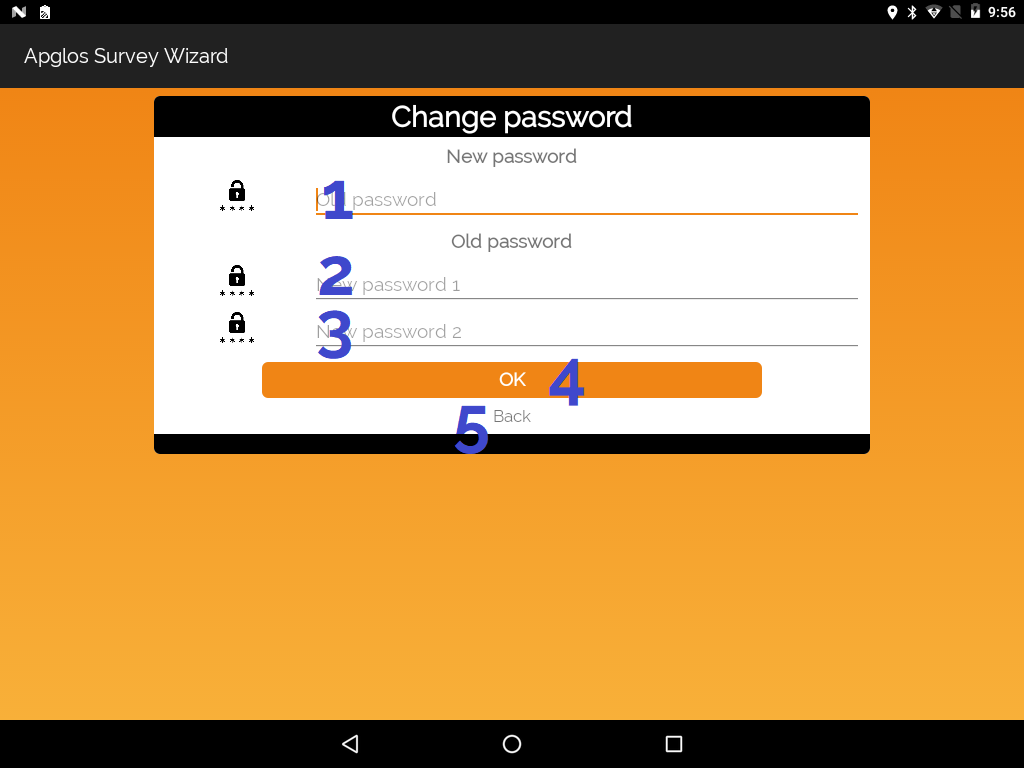
- Location to fill in your old password
- Here you can fill in your new password
- Second position where you have to fill in your new password. This has to be identical to what you filled in at number 2
- Button to change your password
- Option to go back
Information menu
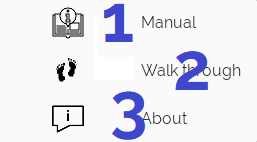
- Option to go to the manual
- Menu item to start the Walk through
- Button to open the About screen
Walk through
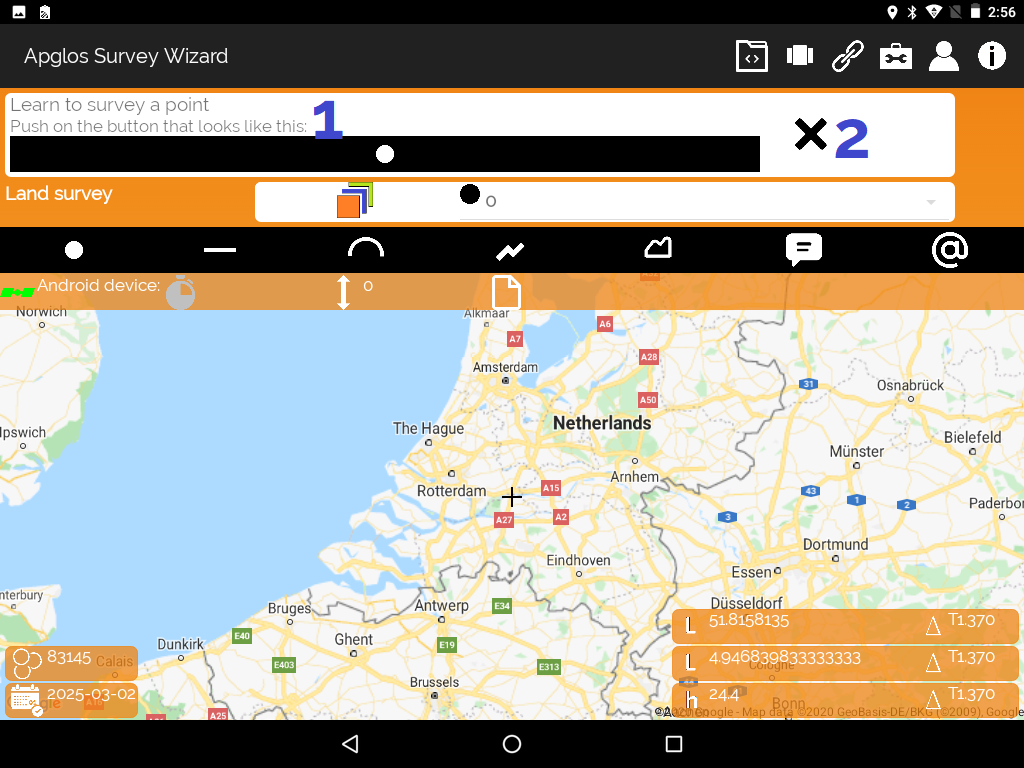
- A step for step guide to learn and understand Apglos Survey Wizard
- Button to close the walk through
About screen
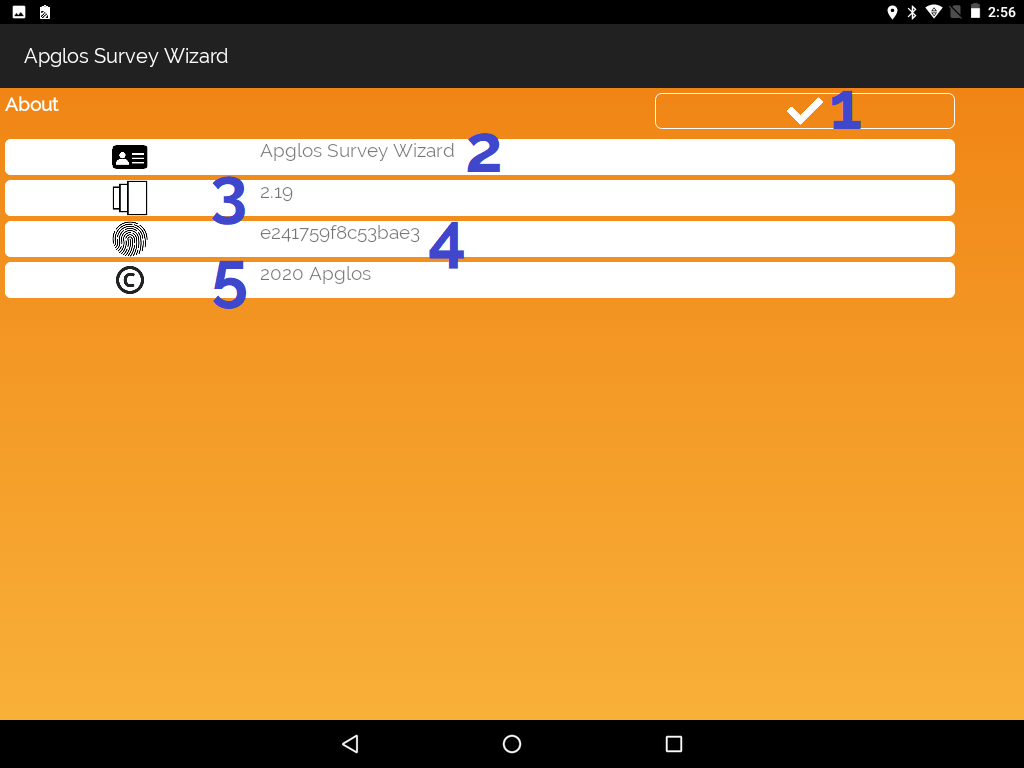
- OK button to go back
- Name of the software package
- Version number
- Android ID of your device
- Copyright claim